Nutanix Enterprise AI on NKPPart 4: CPU, GPU and MCP in a hybrid architecture
Tested onNKP 2.19Nutanix Enterprise AI 2.8.1Envoy AI GatewayLiteLLMVelero 1.18NDK 2.3.0Lab date On a different version, check the compatibility matrix and the release notes before applying.
Summary: in Part 3, NAI answered its first token on CPU. Now it stops being an island. I put the same OpenAI client calling the NAI CPU endpoint and a 30B model on a GB10 GPU, changing only the
model. I get +40% tokens/s on CPU with one environment variable. I bring the vLLM metrics into the NKP Grafana. I turn on the NAI Agentic Gateway: unified endpoint, token-based rate limiting and MCP, validated end to end with two configuration adjustments I show step by step. And I protect NAI with Velero (copy on Backblaze B2) and NDK (local snapshot), with a tested restore on both. This is part 4 of 4.
Where we are
| Part | Topic |
|---|---|
| 1 | NAI: architecture, licensing and sizing |
| 2 | Nutanix Files for Kubernetes: the RWX NAI requires |
| 3 | From the catalog to the first token |
| 4 | CPU, GPU and MCP: NAI in a hybrid architecture (this post) |
The starting point: NAI 2.8.1 on a dedicated NKP cluster, a qwen3-06b-cpu endpoint (Qwen3 0.6B on vLLM, 8 vCPU) and, in the same lab, an ASUS Ascent GX10 (NVIDIA GB10 chip, the DGX Spark platform) serving Nemotron 30B through NIM behind a LiteLLM that the NKP applications already used.
The roadmap in one table
| Step | What it delivers | Lab result |
|---|---|---|
| 1. Same API, CPU and GPU | GX10 LiteLLM routing to NAI | 71 tok/s on GPU, 5.5 tok/s on CPU, same code |
| 2. CPU fine-tuning | VLLM_CPU_OMP_THREADS_BIND | +40% (5.5 → 7.3–8.0 tok/s) |
| 3. Observability | PodMonitor + NKP Grafana dashboard | 349 vllm:* series and CPU throttling in sight |
| 4. Agentic Gateway | Unified endpoint, token-based rate limit, MCP | 200 on the unified endpoint, 429 on the 11th call, MCP end to end |
| 5. Protection | Velero → Backblaze B2 and NDK | Backup and restore tested on both |
1. The same API for CPU and GPU
The design is simple: the LiteLLM that already served the applications becomes the single entry point. Each application has a LiteLLM key; LiteLLM has a NAI API key just for itself.
%3b%7d%23mermaid-0 .cluster rect%7bfill:hsl(0%2c 0%25%2c 98.9215686275%25)%3bstroke:%23707070%3bstroke-width:1px%3b%7d%23mermaid-0 .cluster text%7bfill:%23333%3b%7d%23mermaid-0 .cluster span%7bcolor:%23333%3b%7d%23mermaid-0 .node .collapsed-indicator%7bfill:%23707070%3bstroke:none%3bopacity:0.6%3b%7d%23mermaid-0 .node .collapsed-separator%7bstroke:%23707070%3bstroke-width:0.75px%3b%7d%23mermaid-0 div.mermaidTooltip%7bposition:absolute%3btext-align:center%3bmax-width:200px%3bpadding:2px%3bfont-family:arial%2csans-serif%3bfont-size:12px%3bbackground:hsl(-160%2c 0%25%2c 93.3333333333%25)%3bborder:1px solid %23707070%3bborder-radius:2px%3bpointer-events:none%3bz-index:100%3b%7d%23mermaid-0 .flowchartTitleText%7btext-anchor:middle%3bfont-size:18px%3bfill:black%3b%7d%23mermaid-0 rect.text%7bfill:none%3bstroke-width:0%3b%7d%23mermaid-0 .icon-shape%2c%23mermaid-0 .image-shape%7bbackground-color:white%3btext-align:center%3b%7d%23mermaid-0 .icon-shape p%2c%23mermaid-0 .image-shape p%7bbackground-color:white%3bpadding:2px%3b%7d%23mermaid-0 .icon-shape .label rect%2c%23mermaid-0 .image-shape .label rect%7bopacity:0.5%3bbackground-color:white%3bfill:white%3b%7d%23mermaid-0 .label-icon%7bdisplay:inline-block%3bheight:1em%3boverflow:visible%3bvertical-align:-0.125em%3b%7d%23mermaid-0 .node .label-icon path%7bfill:currentColor%3bstroke:revert%3bstroke-width:revert%3b%7d%23mermaid-0 .node .neo-node%7bstroke:%23999%3b%7d%23mermaid-0 %5bdata-look='neo'%5d.node rect%2c%23mermaid-0 %5bdata-look='neo'%5d.cluster rect%2c%23mermaid-0 %5bdata-look='neo'%5d.node polygon%7bstroke:url(%23mermaid-0-gradient)%3bfilter:drop-shadow( 1px 2px 2px rgba(185%2c185%2c185%2c1))%3b%7d%23mermaid-0 %5bdata-look='neo'%5d.swimlane.cluster rect%7bfilter:none%3b%7d%23mermaid-0 %5bdata-look='neo'%5d.node path%7bstroke:url(%23mermaid-0-gradient)%3bstroke-width:1px%3b%7d%23mermaid-0 %5bdata-look='neo'%5d.node .outer-path%7bfilter:drop-shadow( 1px 2px 2px rgba(185%2c185%2c185%2c1))%3b%7d%23mermaid-0 %5bdata-look='neo'%5d.node .neo-line path%7bstroke:%23999%3bfilter:none%3b%7d%23mermaid-0 %5bdata-look='neo'%5d.node circle%7bstroke:url(%23mermaid-0-gradient)%3bfilter:drop-shadow( 1px 2px 2px rgba(185%2c185%2c185%2c1))%3b%7d%23mermaid-0 %5bdata-look='neo'%5d.node circle .state-start%7bfill:black%3b%7d%23mermaid-0 %5bdata-look='neo'%5d.icon-shape .icon%7bfill:url(%23mermaid-0-gradient)%3bfilter:drop-shadow( 1px 2px 2px rgba(185%2c185%2c185%2c1))%3b%7d%23mermaid-0 %5bdata-look='neo'%5d.icon-shape .icon-neo path%7bstroke:url(%23mermaid-0-gradient)%3bfilter:drop-shadow( 1px 2px 2px rgba(185%2c185%2c185%2c1))%3b%7d%23mermaid-0 :root%7b--mermaid-font-family:arial%2csans-serif%3b%7d%3c/style%3e%3cg%3e%3cmarker id='mermaid-0_flowchart-v2-pointEnd' class='marker flowchart-v2' viewBox='0 0 10 10' refX='5' refY='5' markerUnits='userSpaceOnUse' markerWidth='8' markerHeight='8' orient='auto'%3e%3cpath d='M 0 0 L 10 5 L 0 10 z' class='arrowMarkerPath' style='stroke-width: 1%3b stroke-dasharray: 1%2c 0%3b'/%3e%3c/marker%3e%3cmarker id='mermaid-0_flowchart-v2-pointStart' class='marker flowchart-v2' viewBox='0 0 10 10' refX='4.5' refY='5' markerUnits='userSpaceOnUse' markerWidth='8' markerHeight='8' orient='auto'%3e%3cpath d='M 0 5 L 10 10 L 10 0 z' class='arrowMarkerPath' style='stroke-width: 1%3b stroke-dasharray: 1%2c 0%3b'/%3e%3c/marker%3e%3cmarker id='mermaid-0_flowchart-v2-pointEnd-margin' class='marker flowchart-v2' viewBox='0 0 11.5 14' refX='11.5' refY='7' markerUnits='userSpaceOnUse' markerWidth='10.5' markerHeight='14' orient='auto'%3e%3cpath d='M 0 0 L 11.5 7 L 0 14 z' class='arrowMarkerPath' style='stroke-width: 0%3b stroke-dasharray: 1%2c 0%3b'/%3e%3c/marker%3e%3cmarker id='mermaid-0_flowchart-v2-pointStart-margin' class='marker flowchart-v2' viewBox='0 0 11.5 14' refX='1' refY='7' markerUnits='userSpaceOnUse' markerWidth='11.5' markerHeight='14' orient='auto'%3e%3cpolygon points='0%2c7 11.5%2c14 11.5%2c0' class='arrowMarkerPath' style='stroke-width: 0%3b stroke-dasharray: 1%2c 0%3b'/%3e%3c/marker%3e%3cmarker id='mermaid-0_flowchart-v2-circleEnd' class='marker flowchart-v2' viewBox='0 0 10 10' refX='11' refY='5' markerUnits='userSpaceOnUse' markerWidth='11' markerHeight='11' orient='auto'%3e%3ccircle cx='5' cy='5' r='5' class='arrowMarkerPath' style='stroke-width: 1%3b stroke-dasharray: 1%2c 0%3b'/%3e%3c/marker%3e%3cmarker id='mermaid-0_flowchart-v2-circleStart' class='marker flowchart-v2' viewBox='0 0 10 10' refX='-1' refY='5' markerUnits='userSpaceOnUse' markerWidth='11' markerHeight='11' orient='auto'%3e%3ccircle cx='5' cy='5' r='5' class='arrowMarkerPath' style='stroke-width: 1%3b stroke-dasharray: 1%2c 0%3b'/%3e%3c/marker%3e%3cmarker id='mermaid-0_flowchart-v2-circleEnd-margin' class='marker flowchart-v2' viewBox='0 0 10 10' refY='5' refX='12.25' markerUnits='userSpaceOnUse' markerWidth='14' markerHeight='14' orient='auto'%3e%3ccircle cx='5' cy='5' r='5' class='arrowMarkerPath' style='stroke-width: 0%3b stroke-dasharray: 1%2c 0%3b'/%3e%3c/marker%3e%3cmarker id='mermaid-0_flowchart-v2-circleStart-margin' class='marker flowchart-v2' viewBox='0 0 10 10' refX='-2' refY='5' markerUnits='userSpaceOnUse' markerWidth='14' markerHeight='14' orient='auto'%3e%3ccircle cx='5' cy='5' r='5' class='arrowMarkerPath' style='stroke-width: 0%3b stroke-dasharray: 1%2c 0%3b'/%3e%3c/marker%3e%3cmarker id='mermaid-0_flowchart-v2-crossEnd' class='marker cross flowchart-v2' viewBox='0 0 11 11' refX='12' refY='5.2' markerUnits='userSpaceOnUse' markerWidth='11' markerHeight='11' orient='auto'%3e%3cpath d='M 1%2c1 l 9%2c9 M 10%2c1 l -9%2c9' class='arrowMarkerPath' style='stroke-width: 2%3b stroke-dasharray: 1%2c 0%3b'/%3e%3c/marker%3e%3cmarker id='mermaid-0_flowchart-v2-crossStart' class='marker cross flowchart-v2' viewBox='0 0 11 11' refX='-1' refY='5.2' markerUnits='userSpaceOnUse' markerWidth='11' markerHeight='11' orient='auto'%3e%3cpath d='M 1%2c1 l 9%2c9 M 10%2c1 l -9%2c9' class='arrowMarkerPath' style='stroke-width: 2%3b stroke-dasharray: 1%2c 0%3b'/%3e%3c/marker%3e%3cmarker id='mermaid-0_flowchart-v2-crossEnd-margin' class='marker cross flowchart-v2' viewBox='0 0 15 15' refX='17.7' refY='7.5' markerUnits='userSpaceOnUse' markerWidth='12' markerHeight='12' orient='auto'%3e%3cpath d='M 1%2c1 L 14%2c14 M 1%2c14 L 14%2c1' class='arrowMarkerPath' style='stroke-width: 2.5%3b'/%3e%3c/marker%3e%3cmarker id='mermaid-0_flowchart-v2-crossStart-margin' class='marker cross flowchart-v2' viewBox='0 0 15 15' refX='-3.5' refY='7.5' markerUnits='userSpaceOnUse' markerWidth='12' markerHeight='12' orient='auto'%3e%3cpath d='M 1%2c1 L 14%2c14 M 1%2c14 L 14%2c1' class='arrowMarkerPath' style='stroke-width: 2.5%3b stroke-dasharray: 1%2c 0%3b'/%3e%3c/marker%3e%3cg class='root'%3e%3cg class='clusters'/%3e%3cg class='edgePaths'%3e%3cpath d='M159.609%2c111L166.964%2c111C174.318%2c111%2c189.026%2c111%2c203.068%2c111C217.109%2c111%2c230.484%2c111%2c237.172%2c111L243.859%2c111' id='mermaid-0-L_A_L_0' class='edge-thickness-normal edge-pattern-solid edge-thickness-normal edge-pattern-solid flowchart-link' style='%3b' data-edge='true' data-et='edge' data-id='L_A_L_0' data-points='W3sieCI6MTU5LjYwOTM3NSwieSI6MTExfSx7IngiOjIwMy43MzQzNzUsInkiOjExMX0seyJ4IjoyNDcuODU5Mzc1LCJ5IjoxMTF9XQ==' data-look='classic' marker-end='url(%23mermaid-0_flowchart-v2-pointEnd)'/%3e%3cpath d='M397.703%2c86.11L417.324%2c79.592C436.945%2c73.073%2c476.188%2c60.037%2c514.763%2c53.518C553.339%2c47%2c591.247%2c47%2c610.202%2c47L629.156%2c47' id='mermaid-0-L_L_G_0' class='edge-thickness-normal edge-pattern-solid edge-thickness-normal edge-pattern-solid flowchart-link' style='%3b' data-edge='true' data-et='edge' data-id='L_L_G_0' data-points='W3sieCI6Mzk3LjcwMzEyNSwieSI6ODYuMTEwMTAxNzg4MzkzNjl9LHsieCI6NTE1LjQyOTY4NzUsInkiOjQ3fSx7IngiOjYzMy4xNTYyNSwieSI6NDd9XQ==' data-look='classic' marker-end='url(%23mermaid-0_flowchart-v2-pointEnd)'/%3e%3cpath d='M397.703%2c135.89L417.324%2c142.408C436.945%2c148.927%2c476.188%2c161.963%2c519.875%2c168.482C563.563%2c175%2c611.695%2c175%2c635.762%2c175L659.828%2c175' id='mermaid-0-L_L_N_0' class='edge-thickness-normal edge-pattern-solid edge-thickness-normal edge-pattern-solid flowchart-link' style='%3b' data-edge='true' data-et='edge' data-id='L_L_N_0' data-points='W3sieCI6Mzk3LjcwMzEyNSwieSI6MTM1Ljg4OTg5ODIxMTYwNjMyfSx7IngiOjUxNS40Mjk2ODc1LCJ5IjoxNzV9LHsieCI6NjYzLjgyODEyNSwieSI6MTc1fV0=' data-look='classic' marker-end='url(%23mermaid-0_flowchart-v2-pointEnd)'/%3e%3cpath d='M799.422%2c175L808.701%2c175C817.979%2c175%2c836.536%2c175%2c849.315%2c175C862.094%2c175%2c869.094%2c175%2c872.594%2c175L876.094%2c175' id='mermaid-0-L_N_V_0' class='edge-thickness-normal edge-pattern-solid edge-thickness-normal edge-pattern-solid flowchart-link' style='%3b' data-edge='true' data-et='edge' data-id='L_N_V_0' data-points='W3sieCI6Nzk5LjQyMTg3NSwieSI6MTc1fSx7IngiOjg1NS4wOTM3NSwieSI6MTc1fSx7IngiOjg4MC4wOTM3NSwieSI6MTc1fV0=' data-look='classic' marker-end='url(%23mermaid-0_flowchart-v2-pointEnd)'/%3e%3c/g%3e%3cg class='edgeLabels'%3e%3cg class='edgeLabel' transform='translate(203.734375%2c 111)'%3e%3cg class='label' data-id='L_A_L_0' transform='translate(-19.125%2c -12)'%3e%3cforeignObject width='38.25' height='24'%3e%3cdiv xmlns='http://www.w3.org/1999/xhtml' class='labelBkg' style='display: table-cell%3b white-space: nowrap%3b line-height: 1.5%3b max-width: 200px%3b text-align: center%3b'%3e%3cspan class='edgeLabel'%3e%3cp%3e1 key%3c/p%3e%3c/span%3e%3c/div%3e%3c/foreignObject%3e%3c/g%3e%3c/g%3e%3cg class='edgeLabel' transform='translate(515.4296875%2c 47)'%3e%3cg class='label' data-id='L_L_G_0' transform='translate(-92.7265625%2c -12)'%3e%3cforeignObject width='185.453125' height='24'%3e%3cdiv xmlns='http://www.w3.org/1999/xhtml' class='labelBkg' style='display: table-cell%3b white-space: nowrap%3b line-height: 1.5%3b max-width: 200px%3b text-align: center%3b'%3e%3cspan class='edgeLabel'%3e%3cp%3emodel=nemotron-lightning%3c/p%3e%3c/span%3e%3c/div%3e%3c/foreignObject%3e%3c/g%3e%3c/g%3e%3cg class='edgeLabel' transform='translate(515.4296875%2c 175)'%3e%3cg class='label' data-id='L_L_N_0' transform='translate(-78.9375%2c -12)'%3e%3cforeignObject width='157.875' height='24'%3e%3cdiv xmlns='http://www.w3.org/1999/xhtml' class='labelBkg' style='display: table-cell%3b white-space: nowrap%3b line-height: 1.5%3b max-width: 200px%3b text-align: center%3b'%3e%3cspan class='edgeLabel'%3e%3cp%3emodel=qwen3-cpu-nai%3c/p%3e%3c/span%3e%3c/div%3e%3c/foreignObject%3e%3c/g%3e%3c/g%3e%3cg class='edgeLabel'%3e%3cg class='label' data-id='L_N_V_0' transform='translate(0%2c 0)'%3e%3cforeignObject width='0' height='0'%3e%3cdiv xmlns='http://www.w3.org/1999/xhtml' class='labelBkg' style='display: table-cell%3b white-space: nowrap%3b line-height: 1.5%3b max-width: 200px%3b text-align: center%3b'%3e%3cspan class='edgeLabel'%3e%3c/span%3e%3c/div%3e%3c/foreignObject%3e%3c/g%3e%3c/g%3e%3c/g%3e%3cg class='nodes'%3e%3cg class='node default' id='mermaid-0-flowchart-A-0' data-look='classic' transform='translate(83.8046875%2c 111)'%3e%3crect class='basic label-container' style='' x='-75.8046875' y='-39' width='151.609375' height='78'/%3e%3cg class='label' style='' transform='translate(-45.8046875%2c -24)'%3e%3crect/%3e%3cforeignObject width='91.609375' height='48'%3e%3cdiv xmlns='http://www.w3.org/1999/xhtml' style='display: table-cell%3b white-space: nowrap%3b line-height: 1.5%3b max-width: 200px%3b text-align: center%3b'%3e%3cspan class='nodeLabel'%3e%3cp%3eApplication%3cbr /%3eOpenAI SDK%3c/p%3e%3c/span%3e%3c/div%3e%3c/foreignObject%3e%3c/g%3e%3c/g%3e%3cg class='node default' id='mermaid-0-flowchart-L-1' data-look='classic' transform='translate(322.78125%2c 111)'%3e%3crect class='basic label-container' style='' x='-74.921875' y='-39' width='149.84375' height='78'/%3e%3cg class='label' style='' transform='translate(-44.921875%2c -24)'%3e%3crect/%3e%3cforeignObject width='89.84375' height='48'%3e%3cdiv xmlns='http://www.w3.org/1999/xhtml' style='display: table-cell%3b white-space: nowrap%3b line-height: 1.5%3b max-width: 200px%3b text-align: center%3b'%3e%3cspan class='nodeLabel'%3e%3cp%3eLiteLLM%3cbr /%3eon the GX10%3c/p%3e%3c/span%3e%3c/div%3e%3c/foreignObject%3e%3c/g%3e%3c/g%3e%3cg class='node default' id='mermaid-0-flowchart-G-3' data-look='classic' transform='translate(731.625%2c 47)'%3e%3crect class='basic label-container' style='' x='-98.46875' y='-39' width='196.9375' height='78'/%3e%3cg class='label' style='' transform='translate(-68.46875%2c -24)'%3e%3crect/%3e%3cforeignObject width='136.9375' height='48'%3e%3cdiv xmlns='http://www.w3.org/1999/xhtml' style='display: table-cell%3b white-space: nowrap%3b line-height: 1.5%3b max-width: 200px%3b text-align: center%3b'%3e%3cspan class='nodeLabel'%3e%3cp%3eNIM Nemotron 30B%3cbr /%3eGB10 GPU%3c/p%3e%3c/span%3e%3c/div%3e%3c/foreignObject%3e%3c/g%3e%3c/g%3e%3cg class='node default' id='mermaid-0-flowchart-N-5' data-look='classic' transform='translate(731.625%2c 175)'%3e%3crect class='basic label-container' style='' x='-67.796875' y='-39' width='135.59375' height='78'/%3e%3cg class='label' style='' transform='translate(-37.796875%2c -24)'%3e%3crect/%3e%3cforeignObject width='75.59375' height='48'%3e%3cdiv xmlns='http://www.w3.org/1999/xhtml' style='display: table-cell%3b white-space: nowrap%3b line-height: 1.5%3b max-width: 200px%3b text-align: center%3b'%3e%3cspan class='nodeLabel'%3e%3cp%3eNAI Envoy%3cbr /%3eon NKP%3c/p%3e%3c/span%3e%3c/div%3e%3c/foreignObject%3e%3c/g%3e%3c/g%3e%3cg class='node default' id='mermaid-0-flowchart-V-7' data-look='classic' transform='translate(959.890625%2c 175)'%3e%3crect class='basic label-container' style='' x='-79.796875' y='-39' width='159.59375' height='78'/%3e%3cg class='label' style='' transform='translate(-49.796875%2c -24)'%3e%3crect/%3e%3cforeignObject width='99.59375' height='48'%3e%3cdiv xmlns='http://www.w3.org/1999/xhtml' style='display: table-cell%3b white-space: nowrap%3b line-height: 1.5%3b max-width: 200px%3b text-align: center%3b'%3e%3cspan class='nodeLabel'%3e%3cp%3evLLM on CPU%3cbr /%3eQwen3 0.6B%3c/p%3e%3c/span%3e%3c/div%3e%3c/foreignObject%3e%3c/g%3e%3c/g%3e%3c/g%3e%3c/g%3e%3c/g%3e%3cdefs%3e%3cfilter id='mermaid-0-drop-shadow' height='130%25' width='130%25'%3e%3cfeDropShadow dx='4' dy='4' stdDeviation='0' flood-opacity='0.06' flood-color='black'/%3e%3c/filter%3e%3c/defs%3e%3cdefs%3e%3cfilter id='mermaid-0-drop-shadow-small' height='150%25' width='150%25'%3e%3cfeDropShadow dx='2' dy='2' stdDeviation='0' flood-opacity='0.06' flood-color='black'/%3e%3c/filter%3e%3c/defs%3e%3clinearGradient id='mermaid-0-gradient' gradientUnits='objectBoundingBox' x1='0%25' y1='0%25' x2='100%25' y2='0%25'%3e%3cstop offset='0%25' stop-color='hsl(0%2c 0%25%2c 83.3333333333%25)' stop-opacity='1'/%3e%3cstop offset='100%25' stop-color='hsl(0%2c 0%25%2c 88.9215686275%25)' stop-opacity='1'/%3e%3c/linearGradient%3e%3c/svg%3e)
What changed on the GX10
Three things, with backup and rollback:
- A new API key in NAI (
litellm-gx10), only for the CPU endpoint. The test key stays separate. - LiteLLM learned to trust the internal CA. The container uses Python’s
certifi, which doesn’t know the lab CA. I built a bundle (thecertifiCAs + the internal CA) and pointedSSL_CERT_FILEandREQUESTS_CA_BUNDLEto it. While the NAI name isn’t in DNS, anextra_hostsentry does the job. - A new model in
config.yaml:
- model_name: qwen3-cpu-nai litellm_params: model: openai/qwen3-06b-cpu api_base: https://nai.lab.example.local/enterpriseai/v1 api_key: os.environ/NAI_API_KEY extra_body: chat_template_kwargs: enable_thinking: falseThe openai/ provider works because the NAI API is OpenAI-compatible. Only the LiteLLM container was recreated, and it was back in 11 seconds; NIM didn’t even notice.
The test: same code, two worlds
A Python script with the official OpenAI SDK, running in a pod in the NKP applications cluster. The only difference between the calls is the model:
client = OpenAI(base_url="https://gx10-llm.ai-gateway.svc/v1", api_key=os.environ["API_KEY"])for model in ["nemotron-lightning", "qwen3-cpu-nai"]: stream = client.chat.completions.create(model=model, stream=True, ...)| Model (backend) | TTFT | Tokens/s | ~100 tokens in |
|---|---|---|---|
nemotron-lightning (NIM 30B, GB10 GPU) | 0.08–0.25 s | 71 | 1.5 s |
qwen3-cpu-nai (vLLM 0.6B, CPU, NAI) | 0.43–0.59 s | 5.5 | 14–16 s |
The GPU is 13× faster with a model 50× larger. Nobody will use the 0.6B on CPU for chat; the point is different: the application code doesn’t change, and the LiteLLM usage log records the calls to both backends in the same place.
Best practice: enable the new model on each key
The pod’s first call to the CPU model came back 403: that application’s LiteLLM key was restricted to the GPU models. Enabling a new backend is a per-key decision, not a global one, and that’s a good thing. When you add a model to the gateway, also add it to the keys of the applications that will use it.
2. +40% on CPU with one variable
In Part 3 the CPU endpoint delivered 4.5 tokens/s, and the explanation was CPU throttling: the container sees the node’s 12 cores, vLLM opens 11 OpenMP threads, but the pod limit is 8 vCPU. The Grafana dashboard (section 3) showed the size of the effect: 60% to 77% of periods throttled during generation.
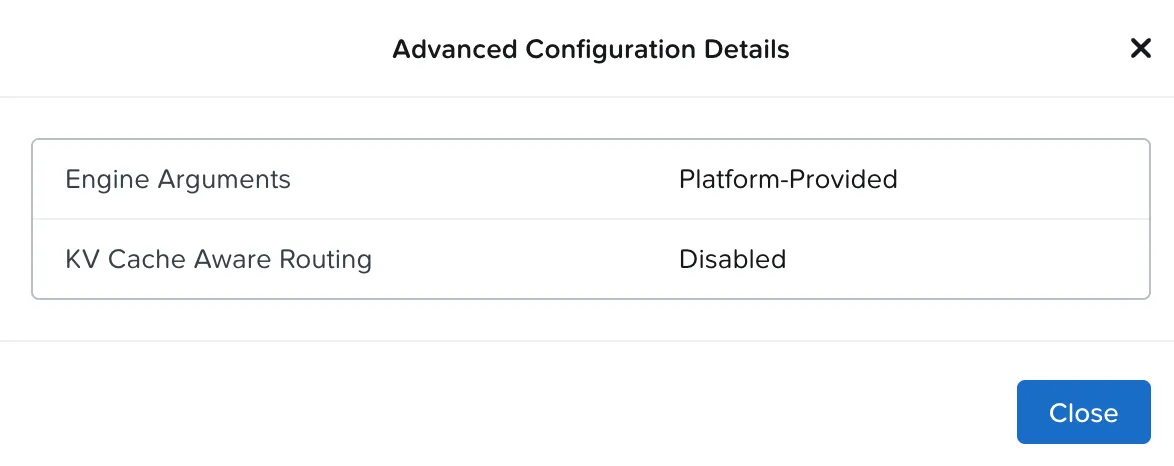
The adjustment is the VLLM_CPU_OMP_THREADS_BIND=0-7 variable, which pins the vLLM threads to 8 cores. In NAI 2.8.1, the endpoint’s advanced configuration offers Engine Arguments and KV Cache Aware Routing; an environment variable like this one goes on the InferenceService:
I applied the variable directly to the KServe InferenceService. This path is outside the NAI UI (in a production environment, proceed with caution); in the lab, NAI kept the change. The rollout needed one adjustment: the predictor uses RollingUpdate, which starts the new pod before removing the old one, and my lab’s inference node (12 vCPU) can’t hold two 8-vCPU pods.
Endpoint bigger than half a node: use
Recreate
Without headroom for the surge, the new pod stays Pending with Insufficient cpu and the autoscaler answers “max node group size reached”. KServe accepts spec.predictor.deploymentStrategy: Recreate on the InferenceService: with it, the old pod goes first. For any endpoint using more than half a node, use Recreate or leave headroom for the surge.
qwen3-cpu-nai (8 vCPU) | Tokens/s | TTFT | ~80 tokens in |
|---|---|---|---|
| Before (11 OpenMP threads) | 5.3–5.7 | 0.43–0.59 s | 14–16.5 s |
After (VLLM_CPU_OMP_THREADS_BIND=0-7) | 7.3–8.0 | 0.29–0.43 s | 10.3–12.2 s |
+40% tokens/s and 30% less total time, without changing vCPU, memory or model.
Make a warm-up call
The first request after the restart took 21.5 s to the first token (vLLM on CPU compiles on the first call). After any endpoint restart, make one throwaway call before letting traffic in.
3. vLLM metrics in the NKP Grafana
NAI shows requests and tokens per endpoint. To also see latency and the pod’s CPU usage, vLLM exposes all of that at /metrics on the predictor’s port 8000; you just point the NKP Prometheus there. It only collects monitors with the Kommander label:
apiVersion: monitoring.coreos.com/v1kind: PodMonitormetadata: name: nai-vllm namespace: nai-admin labels: prometheus.kommander.d2iq.io/select: "true"spec: selector: matchLabels: endpoint.iep.nai.nutanix.com/engine: vllm podMetricsEndpoints: - portNumber: 8000 path: /metrics interval: 15sWithin 10 seconds the target was up and Prometheus had 349 vllm:* series. The dashboard goes in a ConfigMap with grafana_dashboard: "1", which the NKP Grafana sidecar loads on its own:
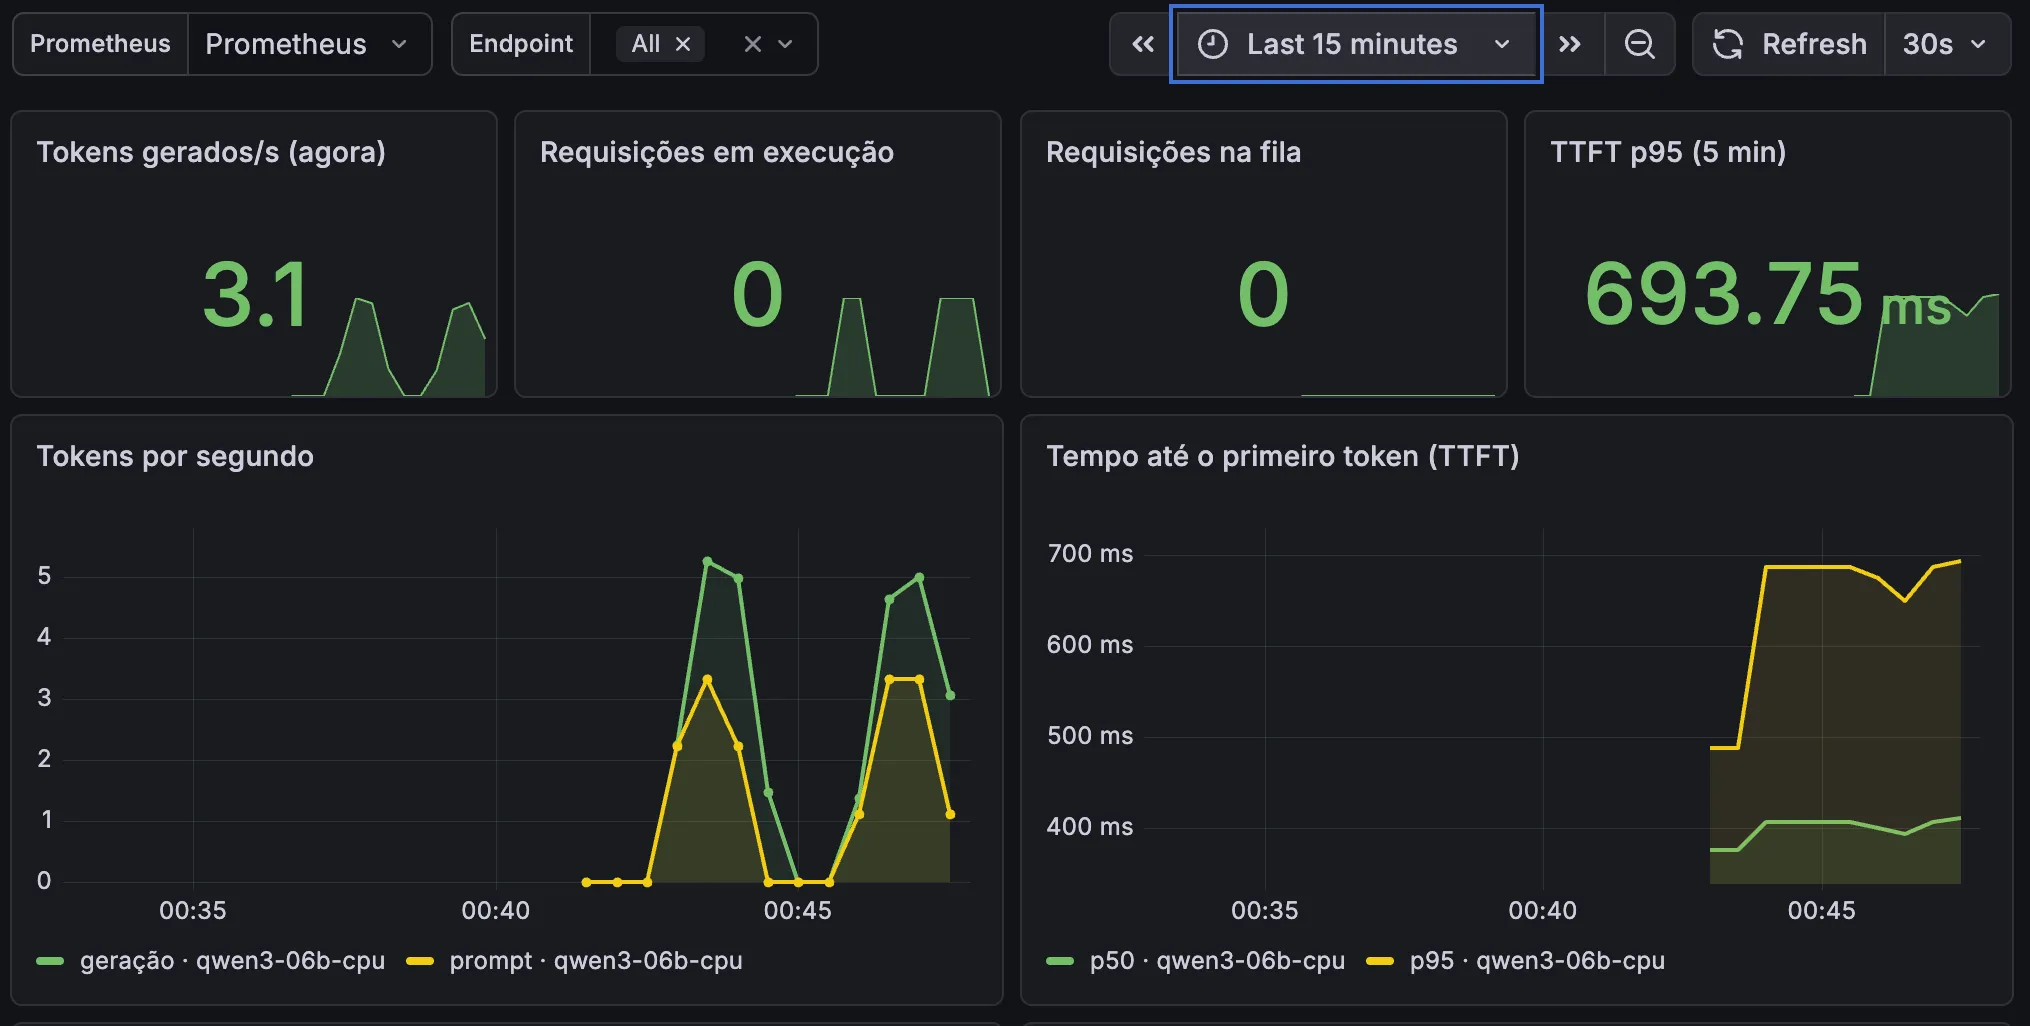
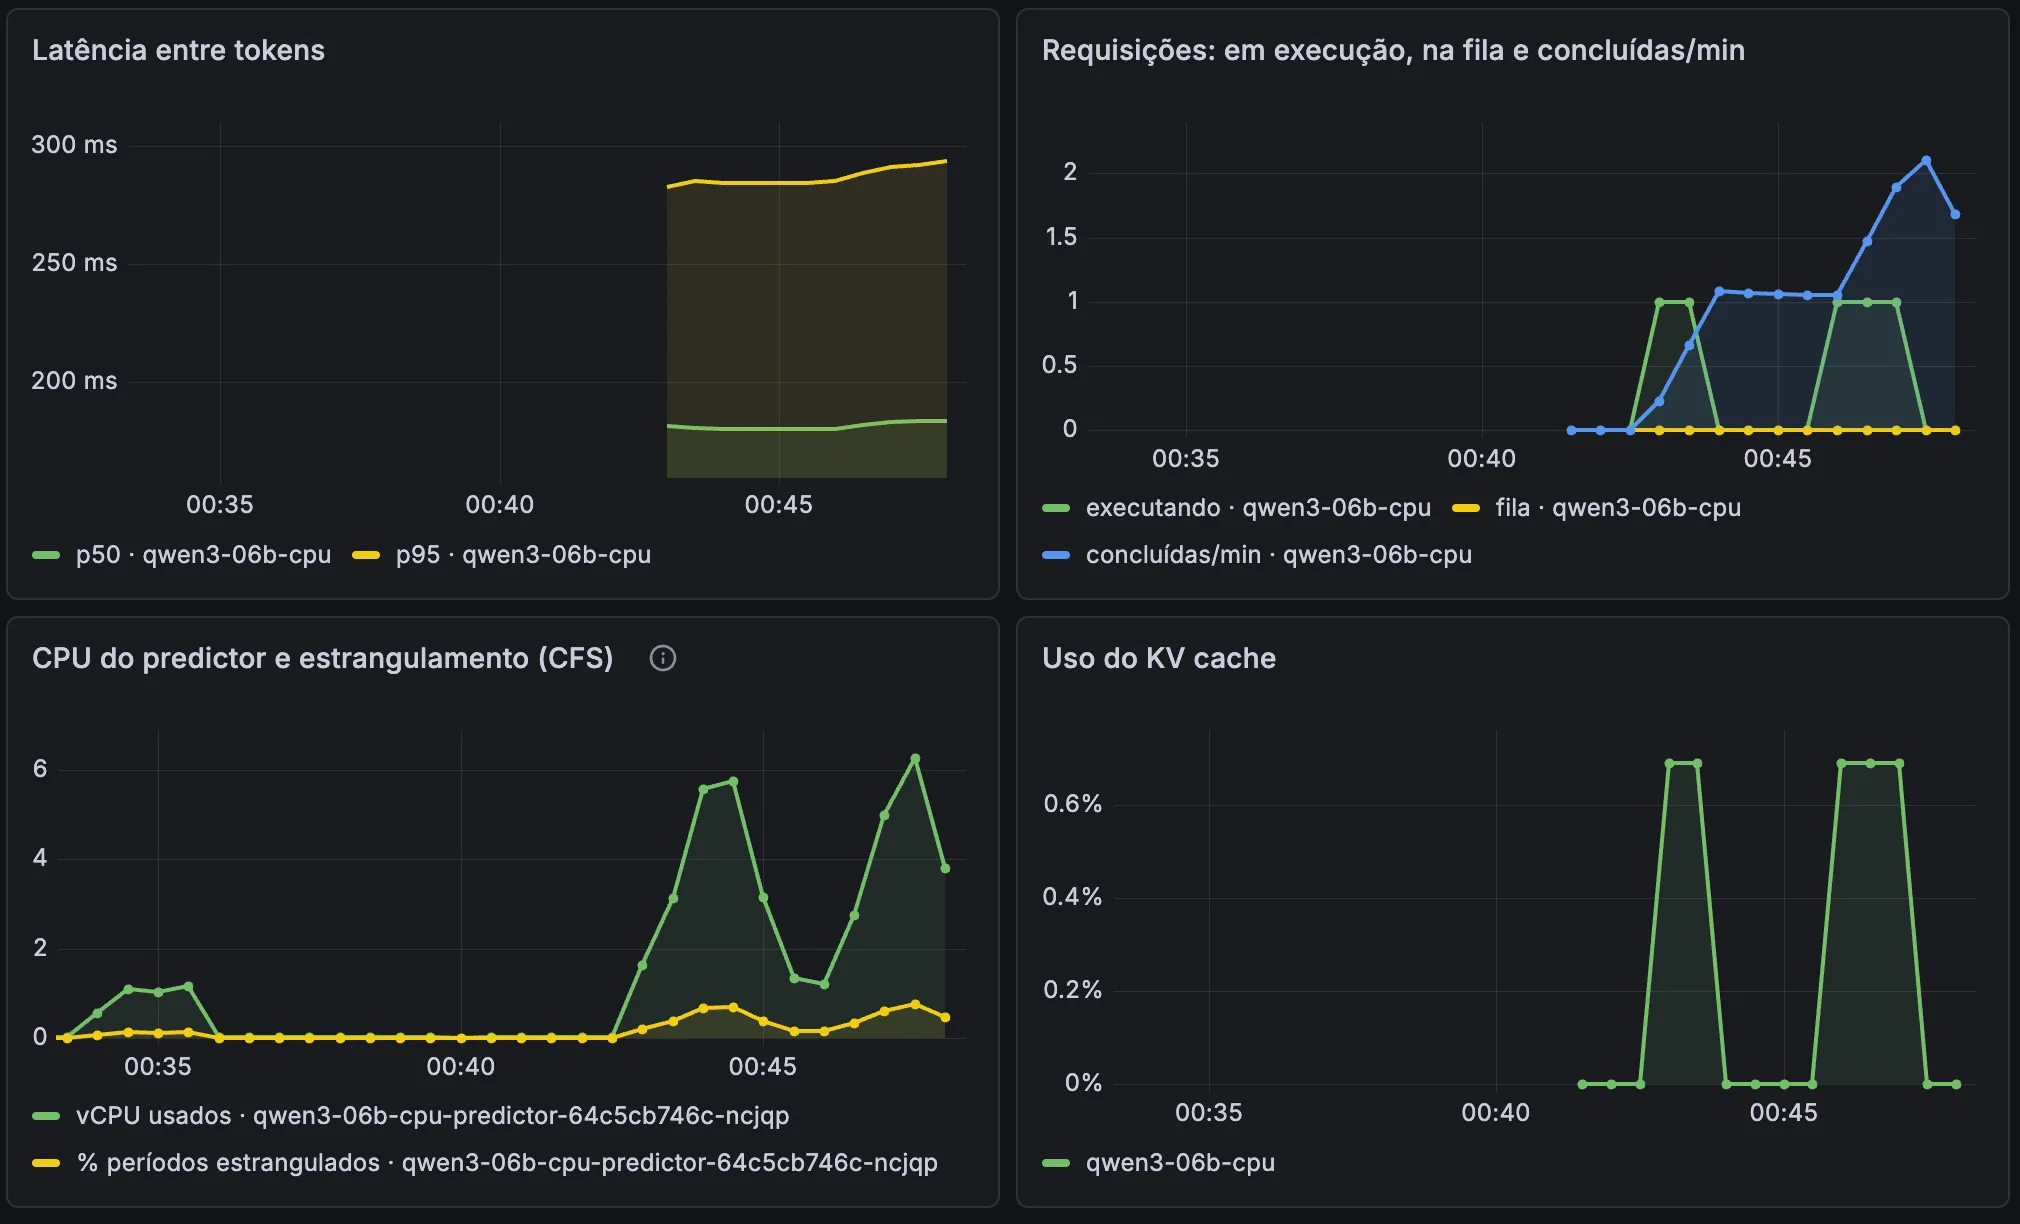
The panel that justified section 2 is predictor CPU and throttling (CFS): during generation, the pod used 5.5–6.3 vCPU and spent 60–77% of periods throttled.
The server confirms the client
The inter-token latency on the dashboard (p50 ~185 ms) is equivalent to ~5.4 tokens/s, the same number measured by the SDK. When client and server agree, the bottleneck is the model, not the network.
4. The Agentic Gateway
NAI 2.8 brought the Agentic Gateway: unified endpoints (one name in front of several models, with load balancing or fallback), external providers, token-based rate limiting and MCP. Underneath is the Envoy AI Gateway. My lab license doesn’t include the Agentic Gateway (Part 3), but the menu is already in the console, and I used the lab to get to know the feature in depth.
Licensing
Everything in this section was done in a lab, to understand the product. In production, include the Agentic Gateway in the license. The sizing guidance below applies either way.
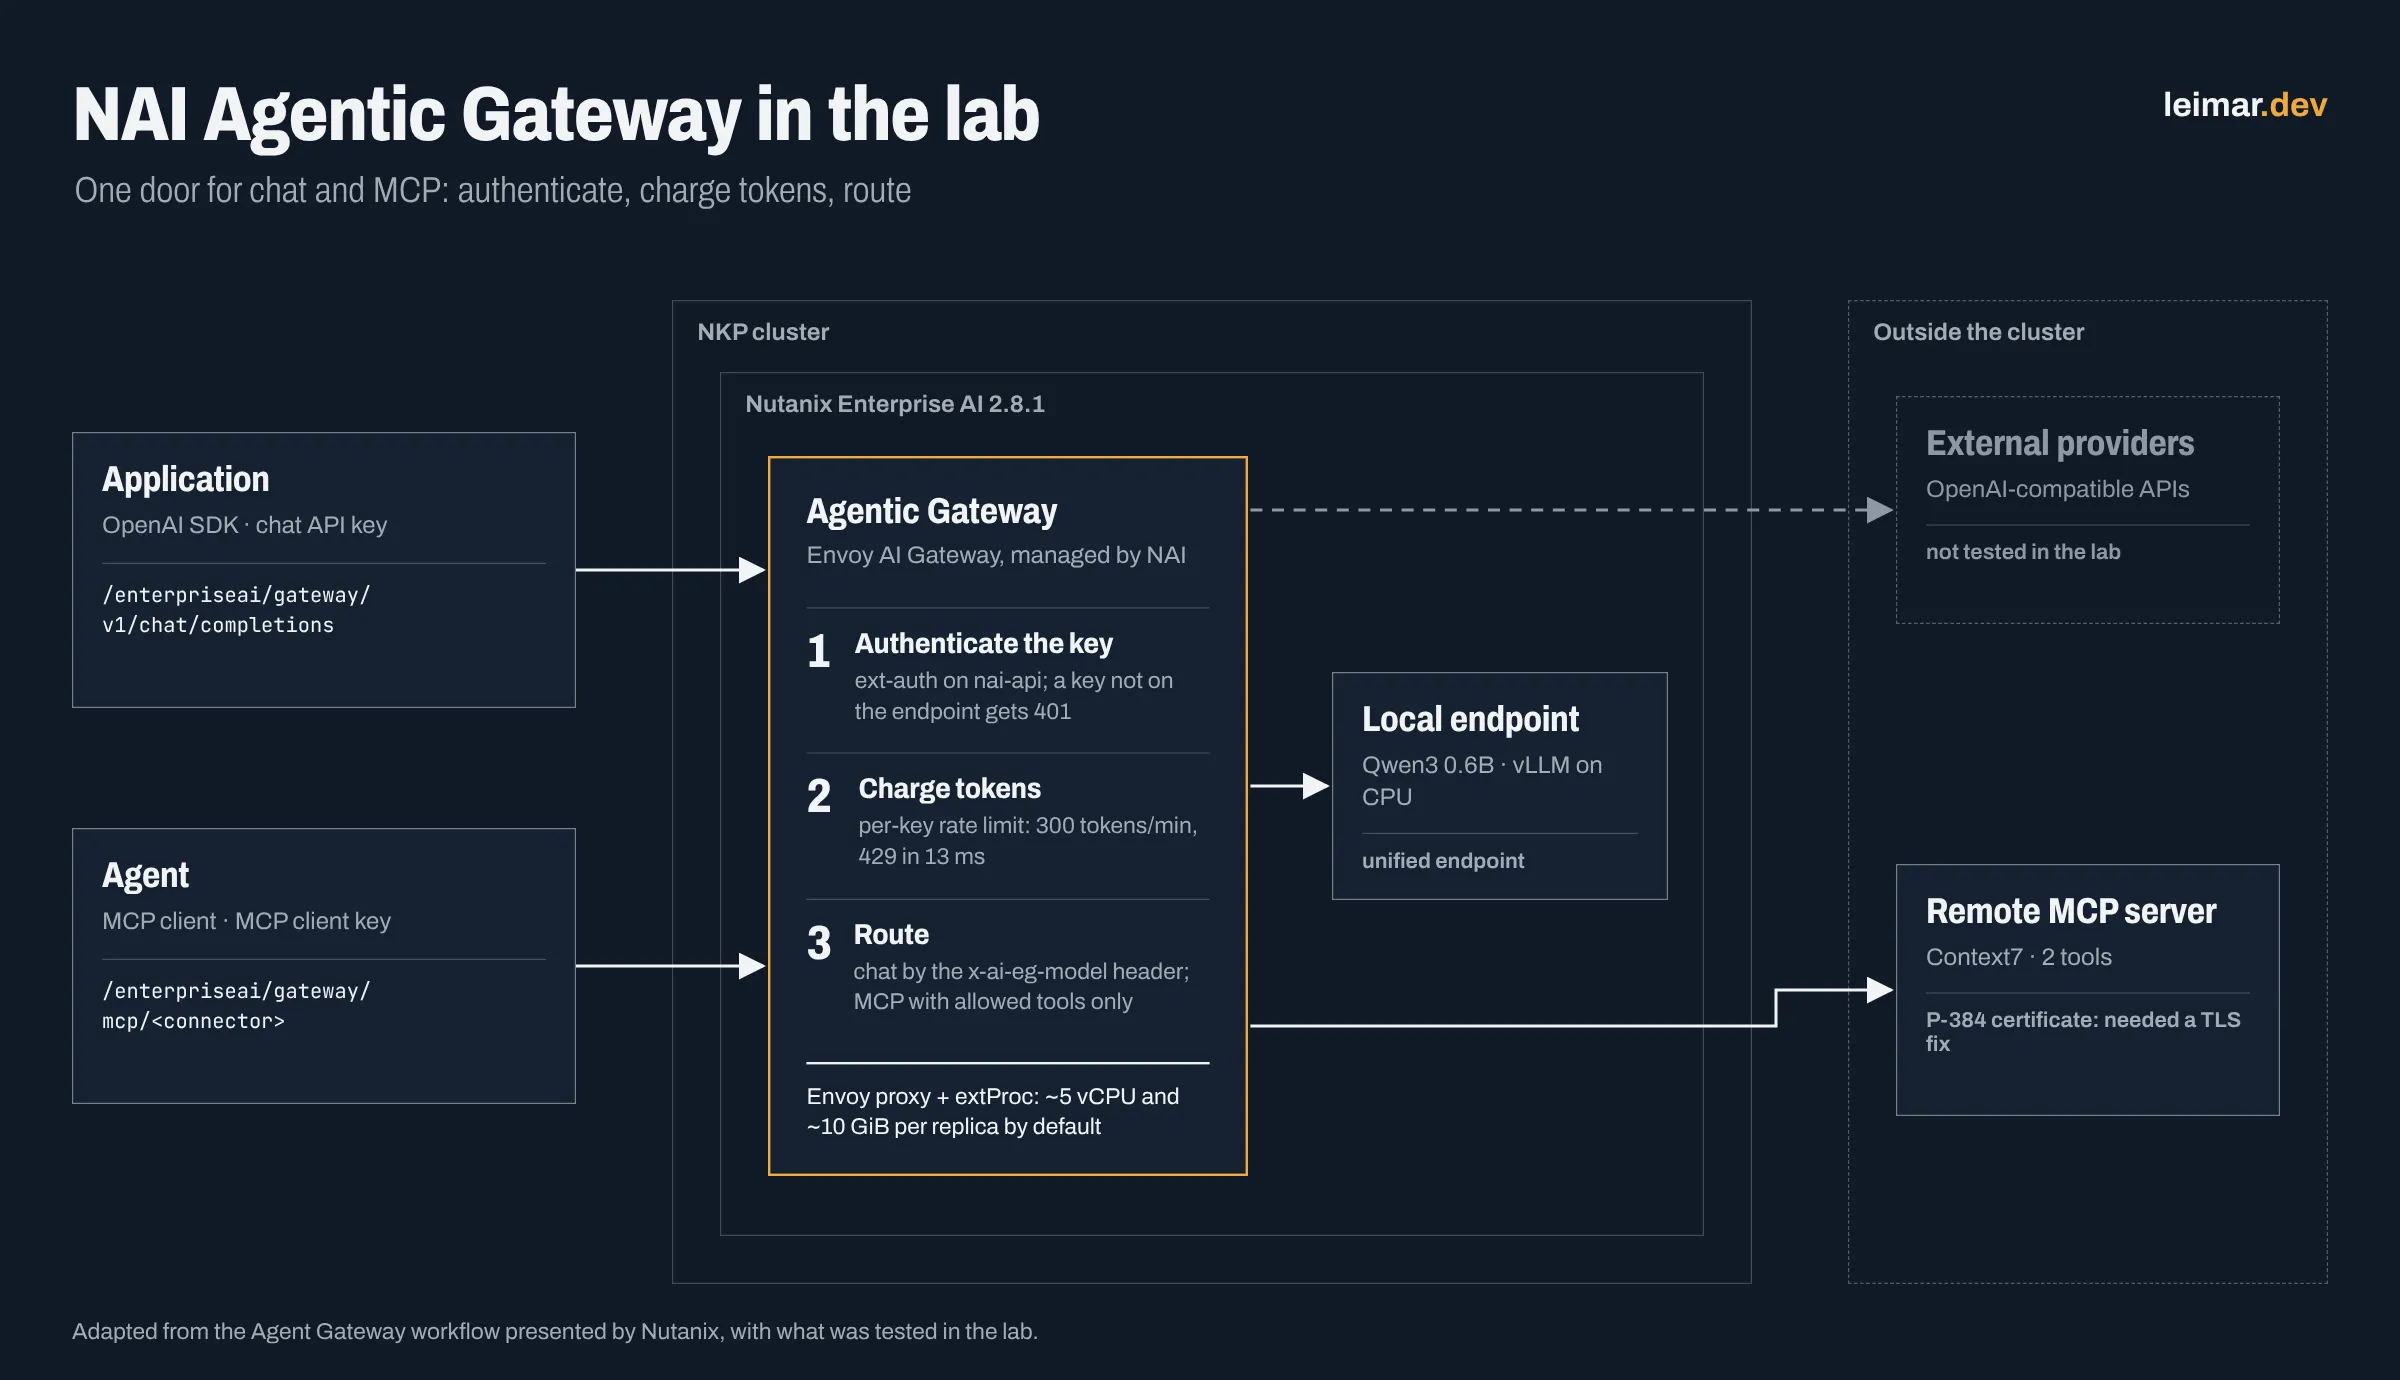
The drawing above sums up what I tested: chat and MCP come in through the same door, and the gateway does three things in sequence before reaching the model or the MCP server. It is adapted from the Agent Gateway workflow Nutanix presented at the NAI 2.7 launch.
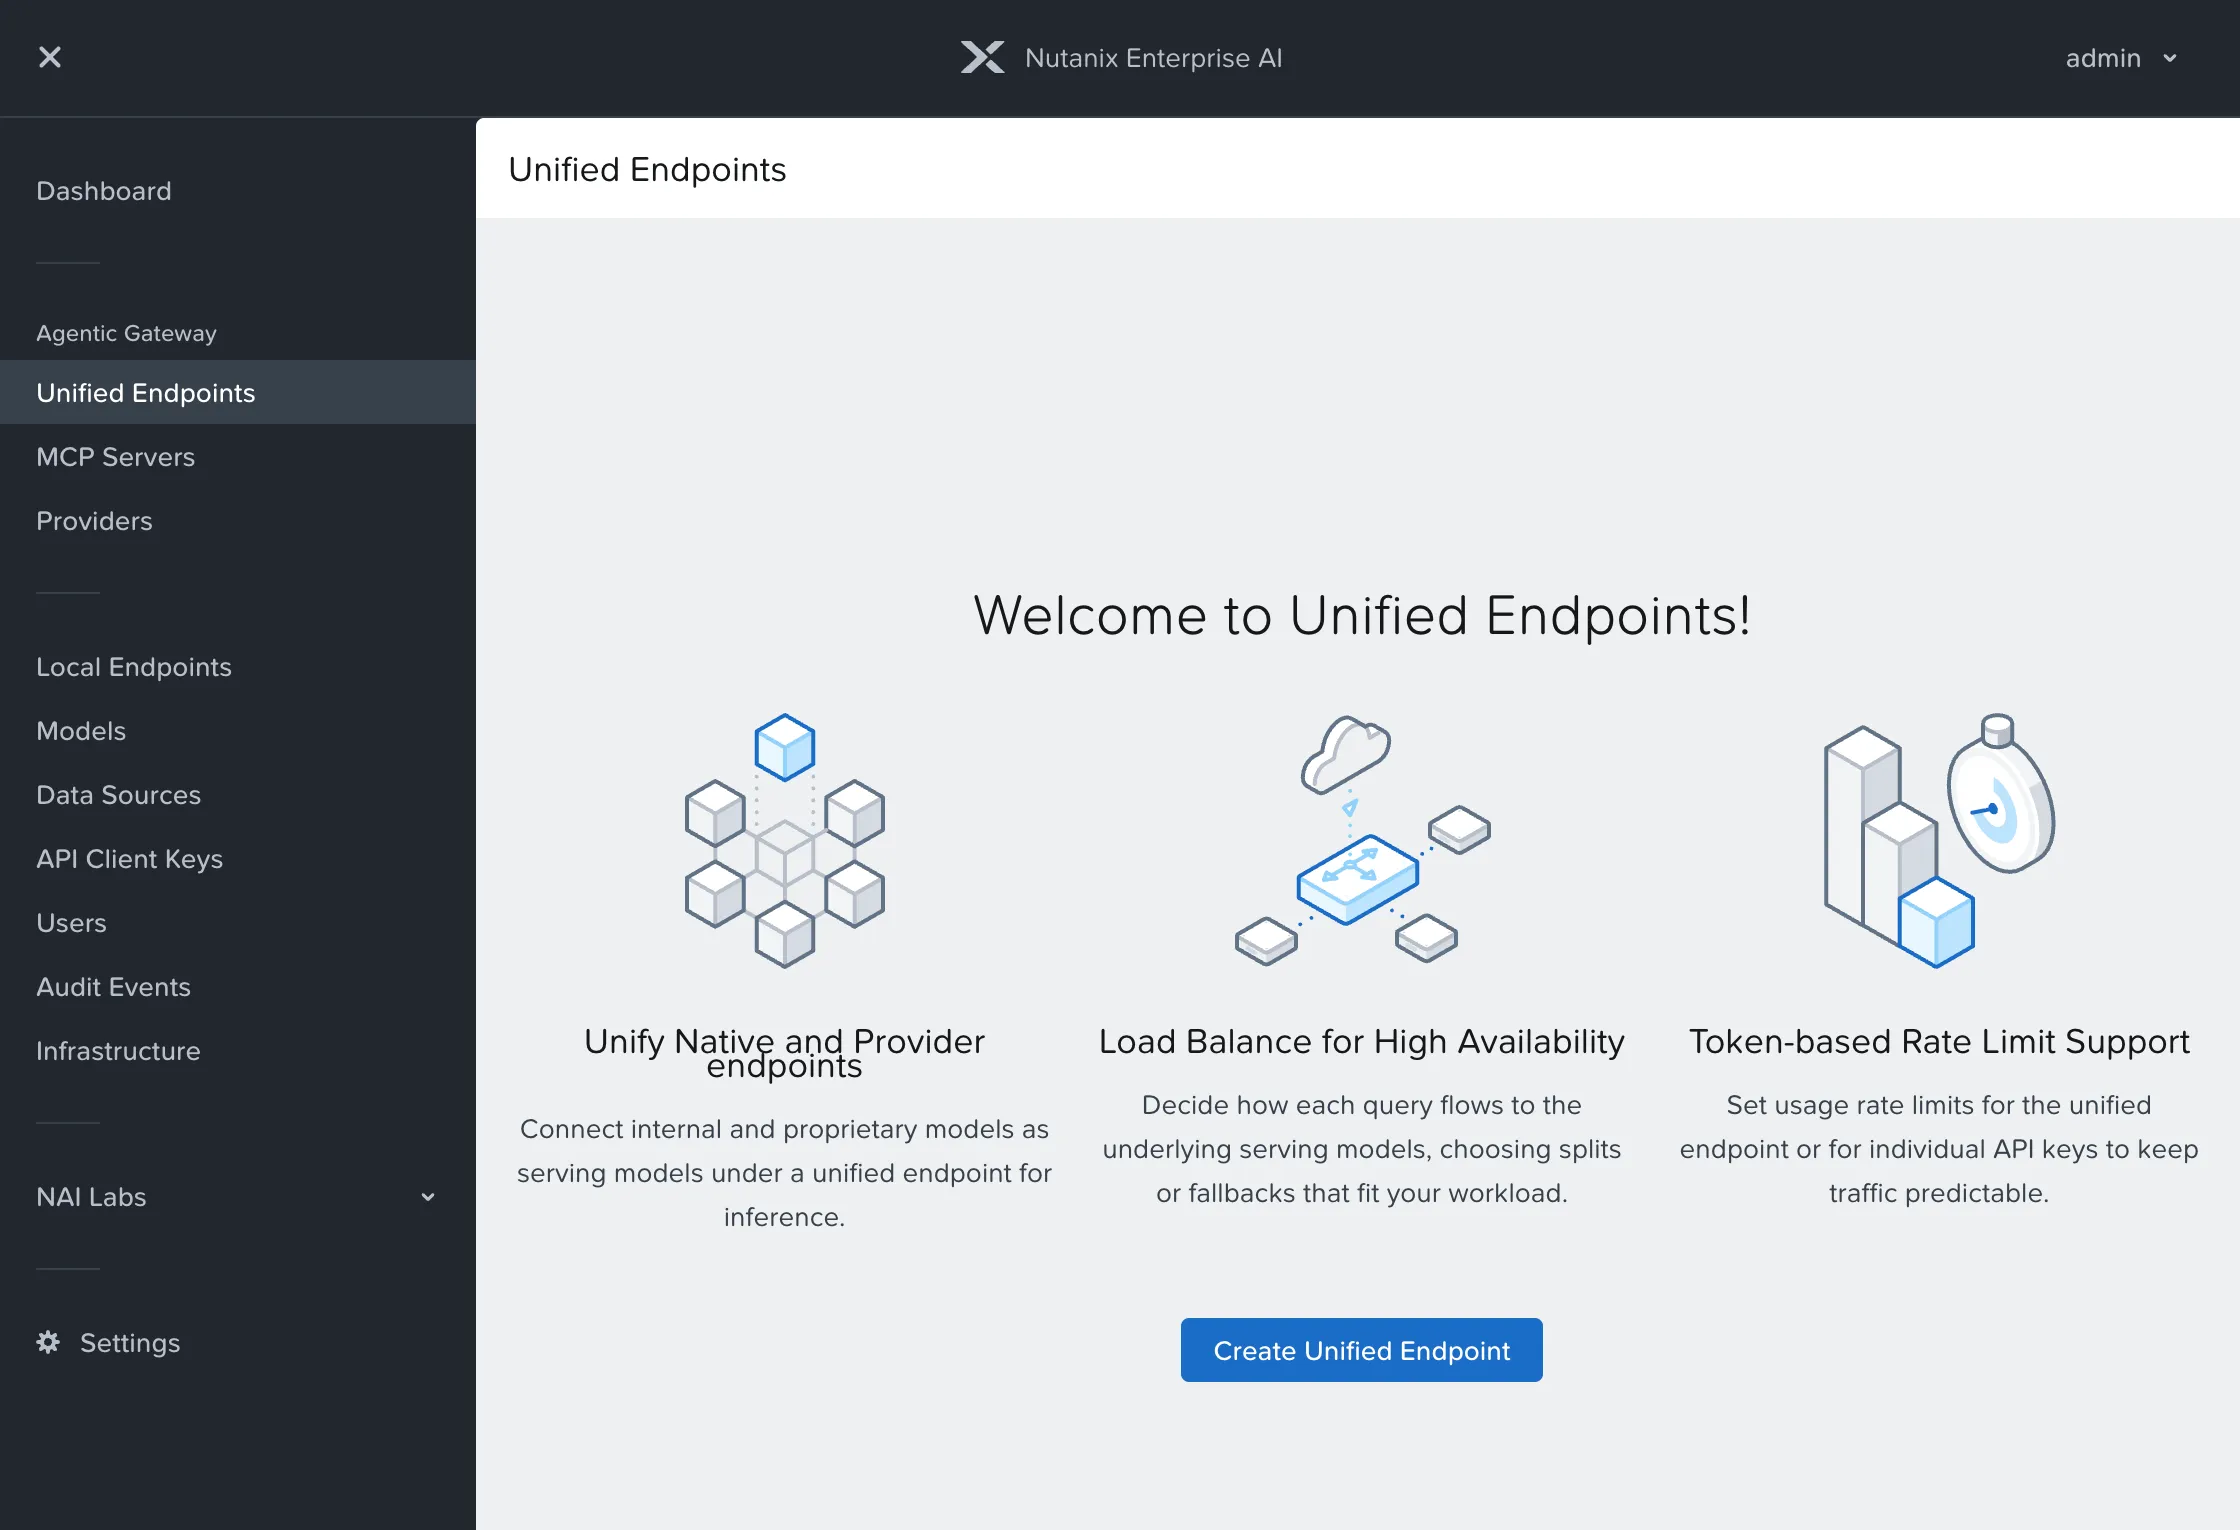
Unified endpoint
I created unified-endpoint-pr, type Chat, with the local CPU endpoint as the model and the test API key:
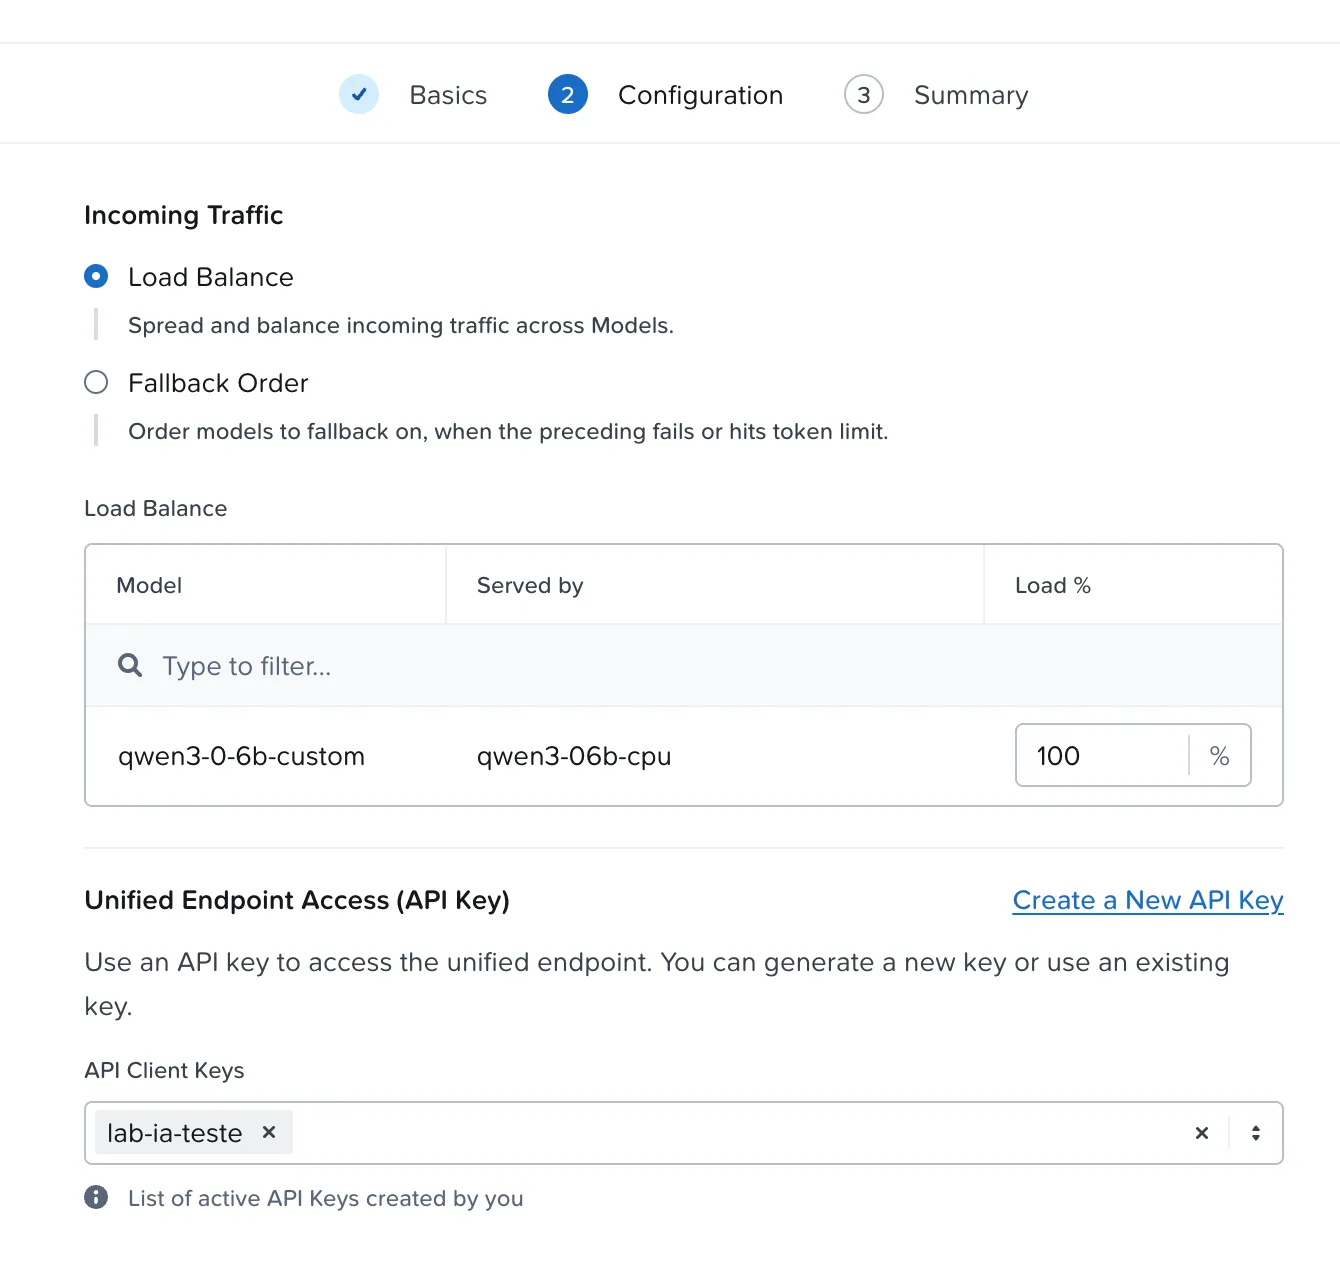
The UI generated an Envoy AI Gateway AIGatewayRoute that matches the x-ai-eg-model: unified-endpoint-pr header, rewrites the model name to the real endpoint’s and counts input, output and total tokens. The path is /enterpriseai/gateway/v1/chat/completions; the local endpoints’ /enterpriseai/v1 returns 404 for the unified endpoint name.
Do this first: headroom for the gateway pod
Creating the first unified endpoint makes the gateway start a new Envoy proxy pod with the ai-gateway-extproc sidecar. The default reserves 3 vCPU for envoy and 2 vCPU + 8 GiB for extProc, per replica, and the rollout needs that headroom on one node next to the current pod. In my lab, without that headroom, the new pod stayed Pending with Insufficient cpu and the first call came back 500 with no body in 10 ms (it wasn’t the license). Meanwhile, the old pod keeps serving the rest of NAI. Before the first test, check that the new proxy pod is Running.
In the lab, I reduced the requests (not the limits) in the NAI GatewayConfig and EnvoyProxy. The new pod came up in 67 seconds, the old one left on its own, and the unified endpoint answered 200 in 5.4 s. In production, the recommended path is to size the gateway nodes for the default values. That’s about 5 vCPU and 10 GiB per replica that enter the math before any model.
Token-based rate limiting
Rate limiting is by tokens, not requests: global for the endpoint and, optionally, per API key (or per value of a header, when several applications share the key).
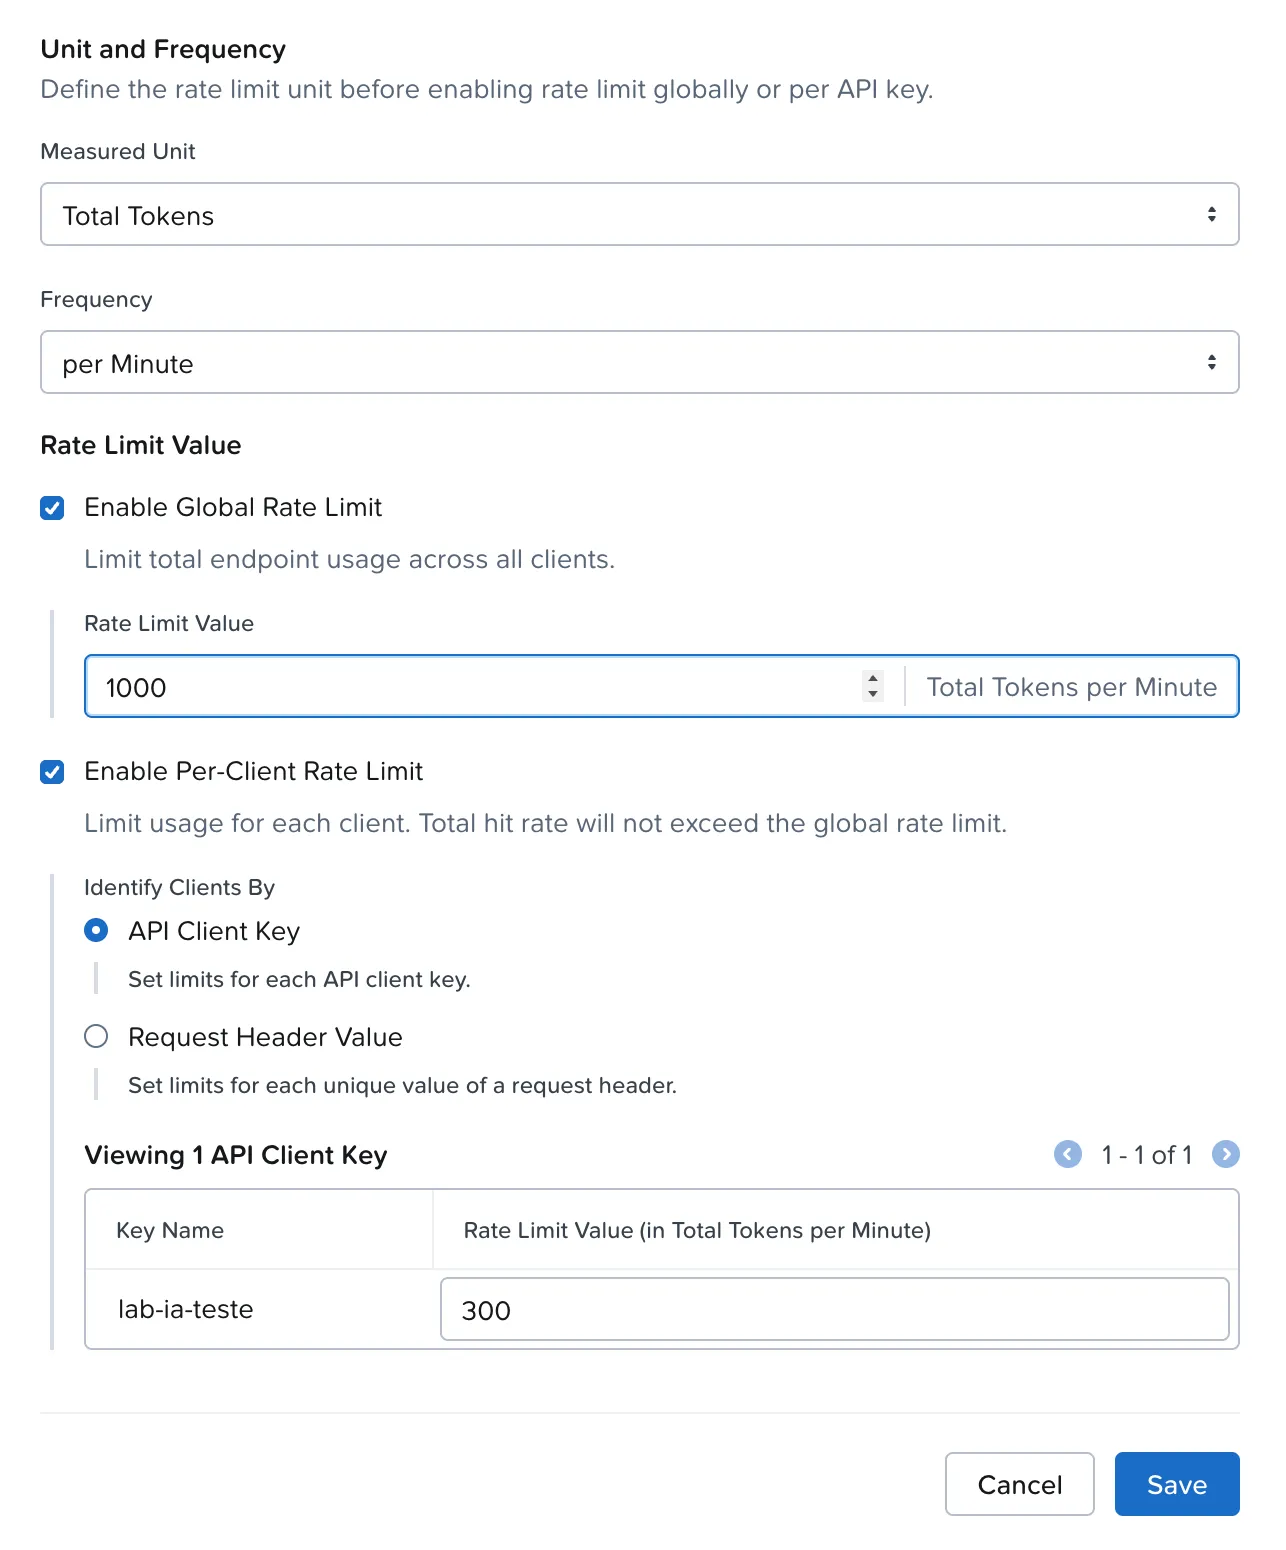
Underneath it becomes an Envoy BackendTrafficPolicy with two rules. The client rule identifies the key by the X-Nutanix-Api-Key-Id header, which NAI itself injects after authenticating, and the cost of each request is the total tokens in the response. The test burst, with 300 tokens/min for the key:
| Call | HTTP | Tokens | x-ratelimit-remaining |
|---|---|---|---|
| 1 | 200 | 40 | 300 |
| 2 | 200 | 29 | 260 |
| 3 | 200 | 29 | 231 |
| … | 200 | 29–40 | … |
| 10 | 200 | 40 | 20 |
| 11 | 429 | — | 0 |
The counter deducts each response’s real tokens, and the 11th call is blocked at the gateway, in 13 ms, without reaching the model.
The key must be attached to the endpoint
An API key valid for the local endpoint, but not associated with the unified endpoint, gets 401 “failed to validate API Key against multi-endpoint types”. NAI controls access per key and per endpoint.
MCP: servers, connectors and tool control
The MCP part has three pieces:
- MCP Servers: local (NAI deploys them from a Docker image) or remote (a URL).
- MCP Connectors: group one or more servers and choose which tools each one exposes.
- MCP Client Keys: a key type of their own, separate from the chat API keys.
I used a public remote MCP server, Context7 (library documentation). The connector discovered both tools; enabling both requires typing “confirm”:
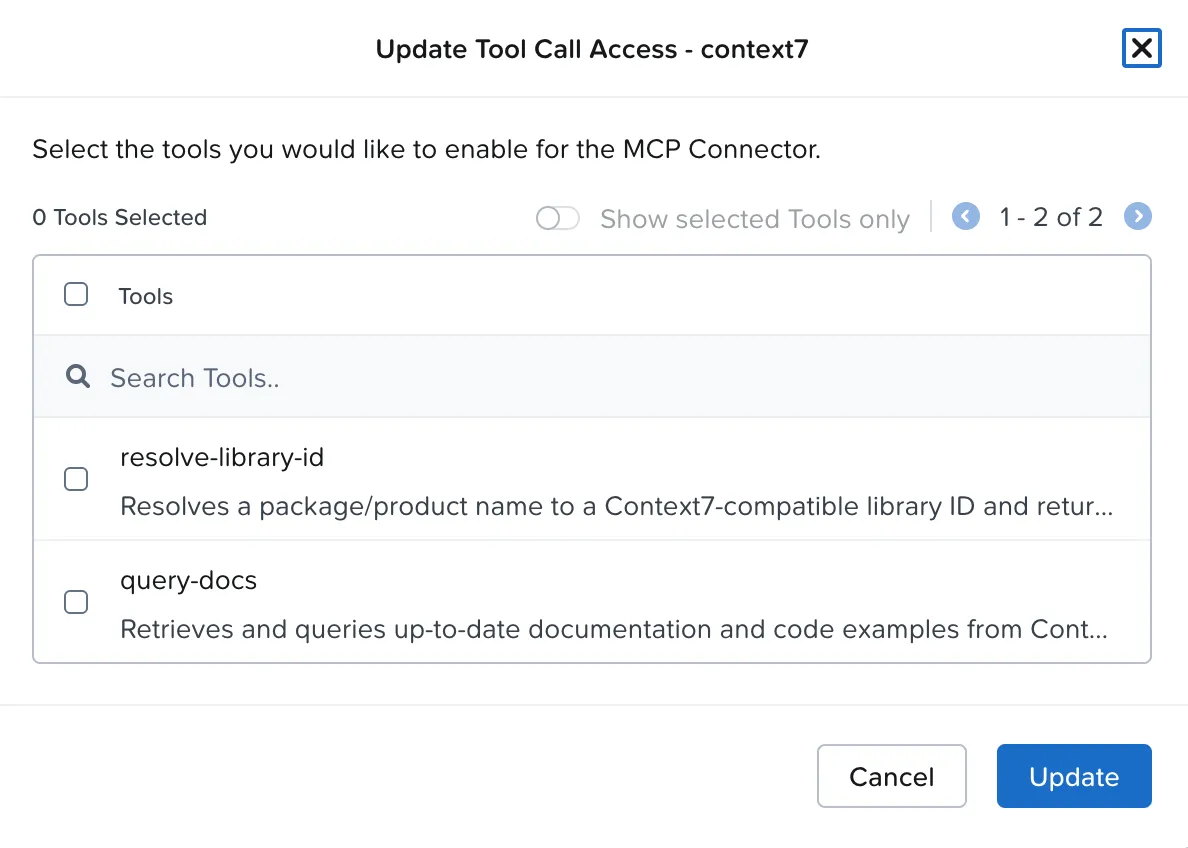
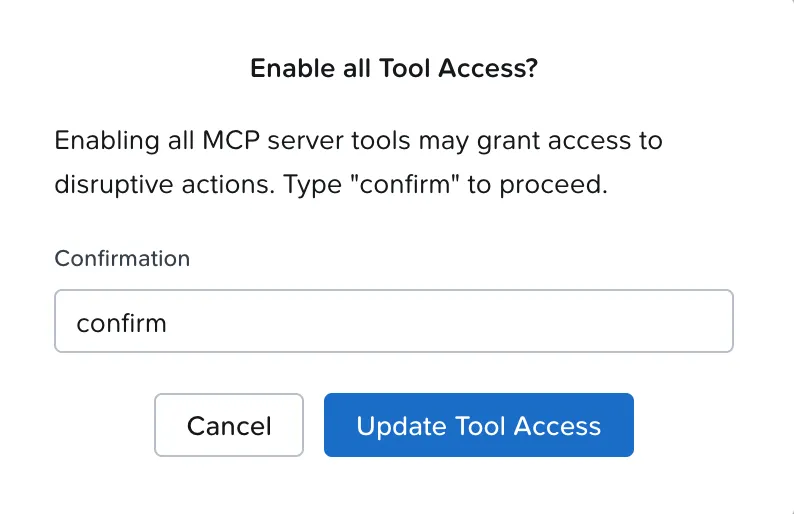
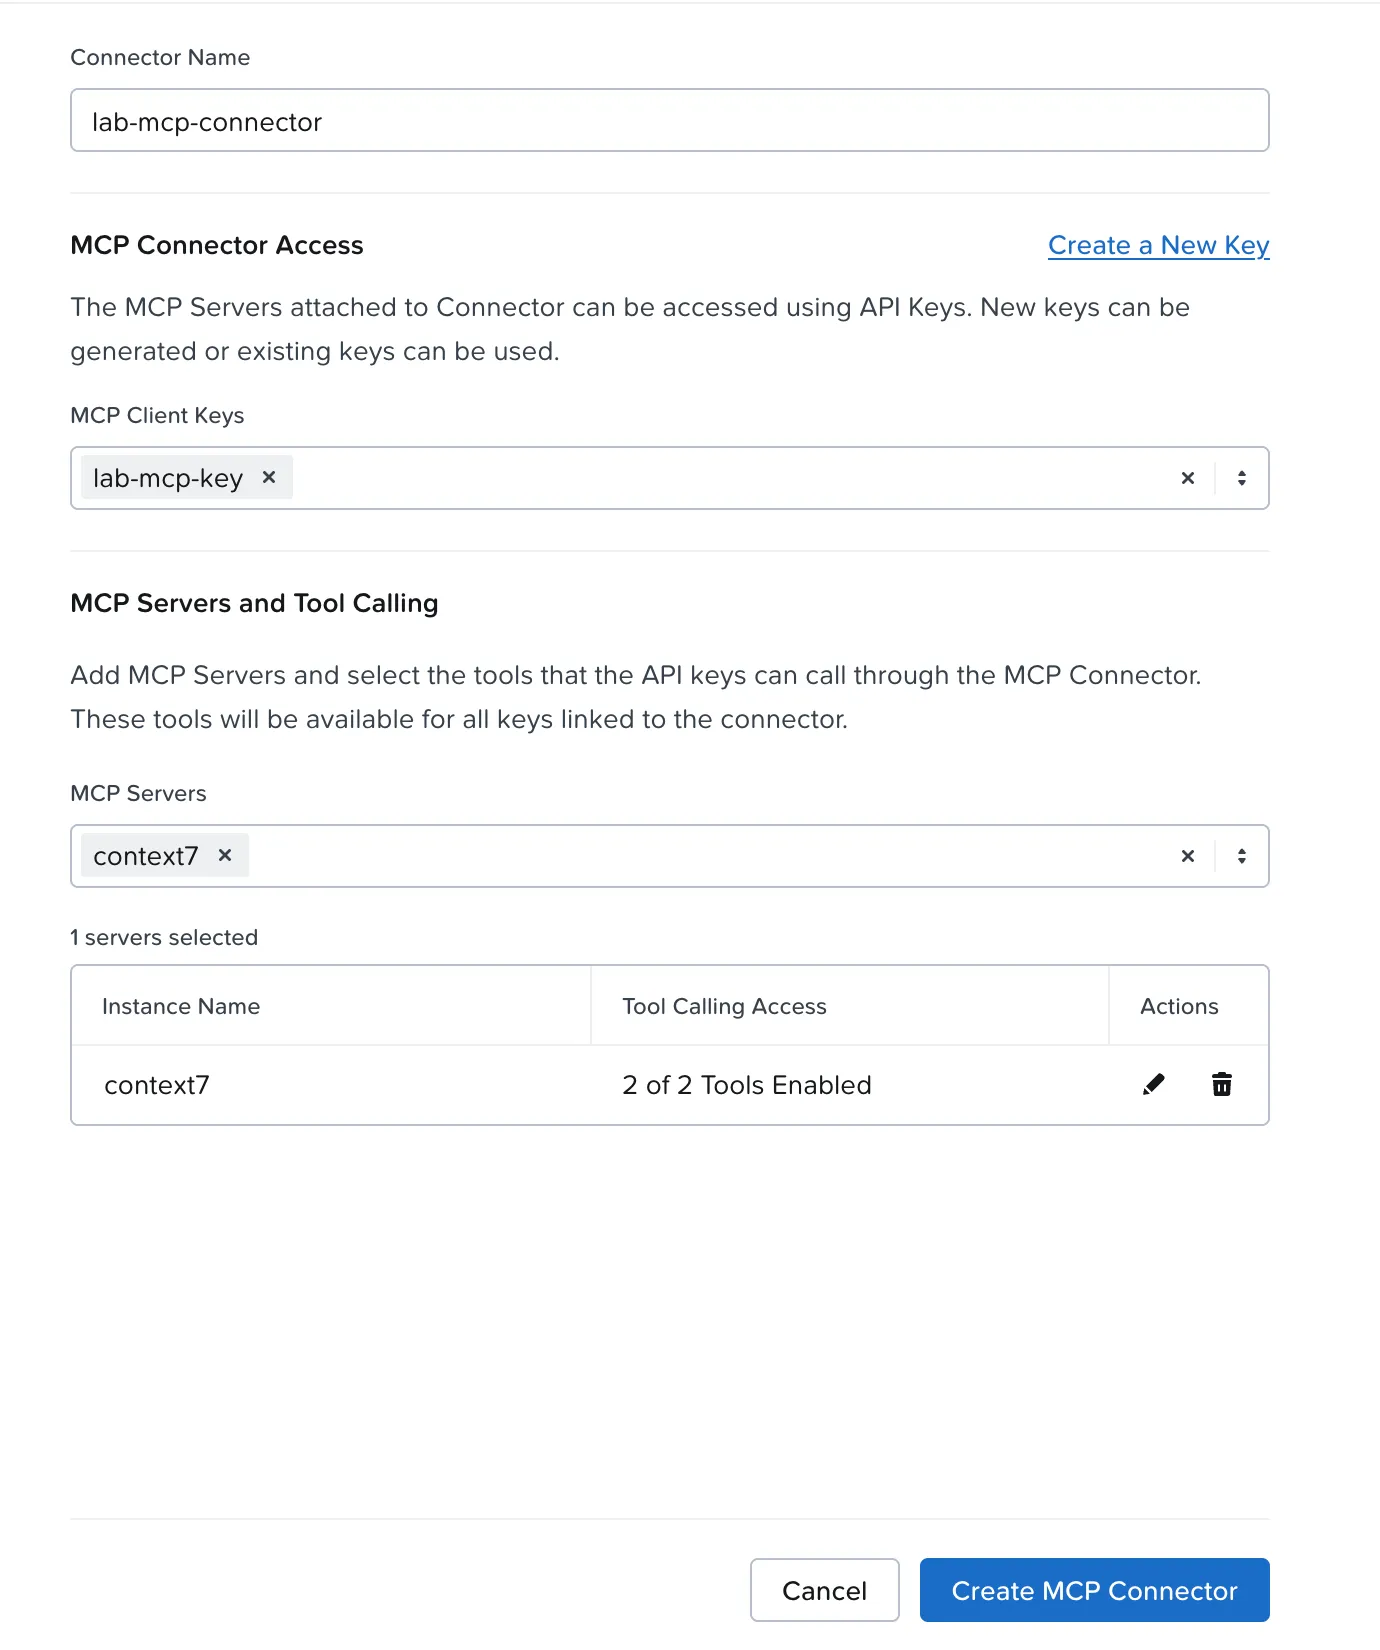
The connector becomes an MCPRoute at /enterpriseai/gateway/mcp/<connector>, with a toolSelector listing the allowed tools. That’s how the UI’s “Tool Control” becomes configuration.
MCP server with a P-384 certificate: add the curve to the
Backend
If the initialize through the gateway comes back 500 “failed to create MCP session to any backend” and the extProc log shows TLS_error … BAD_ECC_CERT, check the server certificate’s curve. Context7’s is ECDSA P-384, and the Backend created for the remote server uses Envoy’s default curves (X25519 and P-256). Adding ecdhCurves: [X25519, P-256, P-384, P-521], the SNI and the system CAs to the Backend solved it.
apiVersion: gateway.envoyproxy.io/v1alpha1kind: Backendmetadata: name: mcp-context7 namespace: nai-admin-extensionsspec: type: Endpoints endpoints: - fqdn: { hostname: mcp.context7.com, port: 443 } tls: sni: mcp.context7.com wellKnownCACertificates: System ecdhCurves: [X25519, P-256, P-384, P-521]With that, MCP through the Agentic Gateway worked end to end:
| MCP call | HTTP | Time | Note |
|---|---|---|---|
initialize | 200 | 0.77 s | The answer comes from envoy-ai-gateway: the gateway is the MCP server for the client |
tools/list | 200 | 0.31 s | Tools prefixed by server: mcp-context7__resolve-library-id |
tools/call | 200 | 1.44 s | Returned the Envoy Gateway libraries |
The prefix is what lets a connector group several servers without name clashes.
Validate the remote MCP server before creating the connector
Tool discovery doesn’t go through the gateway: it’s nai-api itself that opens the MCP session with the server. In my first test, with DeepWiki, the notifications/initialized step went past the nai-api timeout (502 after 16 s) and the UI stayed on “Loading”. With Context7, in the same environment, discovery completed normally. Test your server’s session before taking it to production.
5. Protecting NAI: Velero and NDK
NAI keeps state in four RWO volumes in nai-system (the PostgreSQL database, ClickHouse, its keeper and Valkey) and the models in Files RWX volumes. The database runs as a single instance, so include these volumes in your backup routine. I used both tools from the NKP catalog, with different roles.
Velero with an off-lab copy (Backblaze B2)
NKP 2.19’s Velero is 1.18, with the AWS plugin, data mover (Kopia) and node-agent. The target was a Backblaze B2 bucket, S3-compatible and outside the lab. Two notes for B2: checksumAlgorithm: "" in the backup storage location (the new plugin sends a checksum B2 may reject) and the bucket lifecycle set to “keep only the last version”, or deleted backups become hidden versions and the space only grows.
When enabling Velero, the console warns that Rook Ceph Cluster is missing:
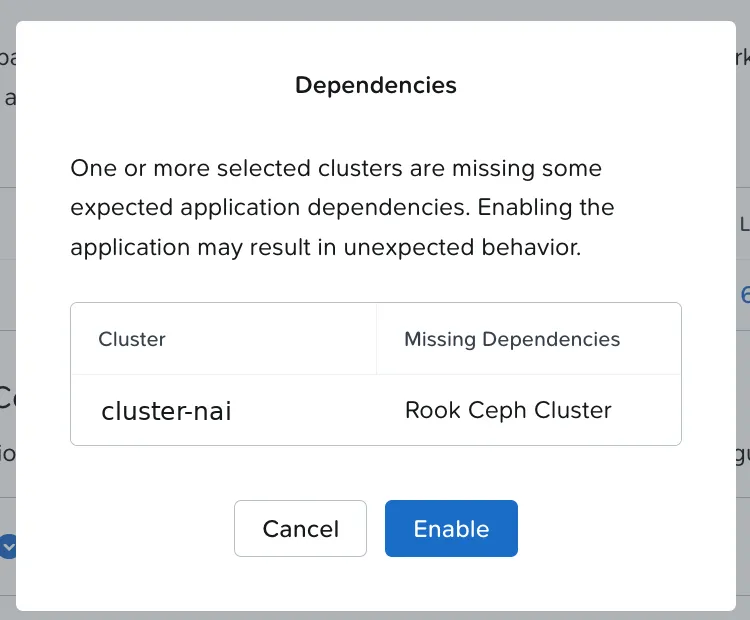
With an external S3 target, Rook Ceph isn’t needed
This warning applies if you use the local Ceph as the target. With external S3, just click Enable. In my lab I enabled Rook anyway: it brought mons, mgrs and a request for 160 GiB of OSDs to a cluster already at 77–96% CPU reserved, and a NAI pod went Pending. When disabling, order matters: with the operator disabled before the cluster, the resources stayed on finalizers. If you enabled it without needing it, disable Rook Ceph Cluster first and only then Rook Ceph.
Two more details of Velero on NKP:
- The pre-install waits 5 minutes for Ceph. With an external target, Velero comes up on its own after that; it’s not an error.
- After editing an override in the console, check the Helm revision. In my test, I changed the schedule and the release stayed on revision 1; checking that the release moved to a new revision confirms the change reached the cluster.
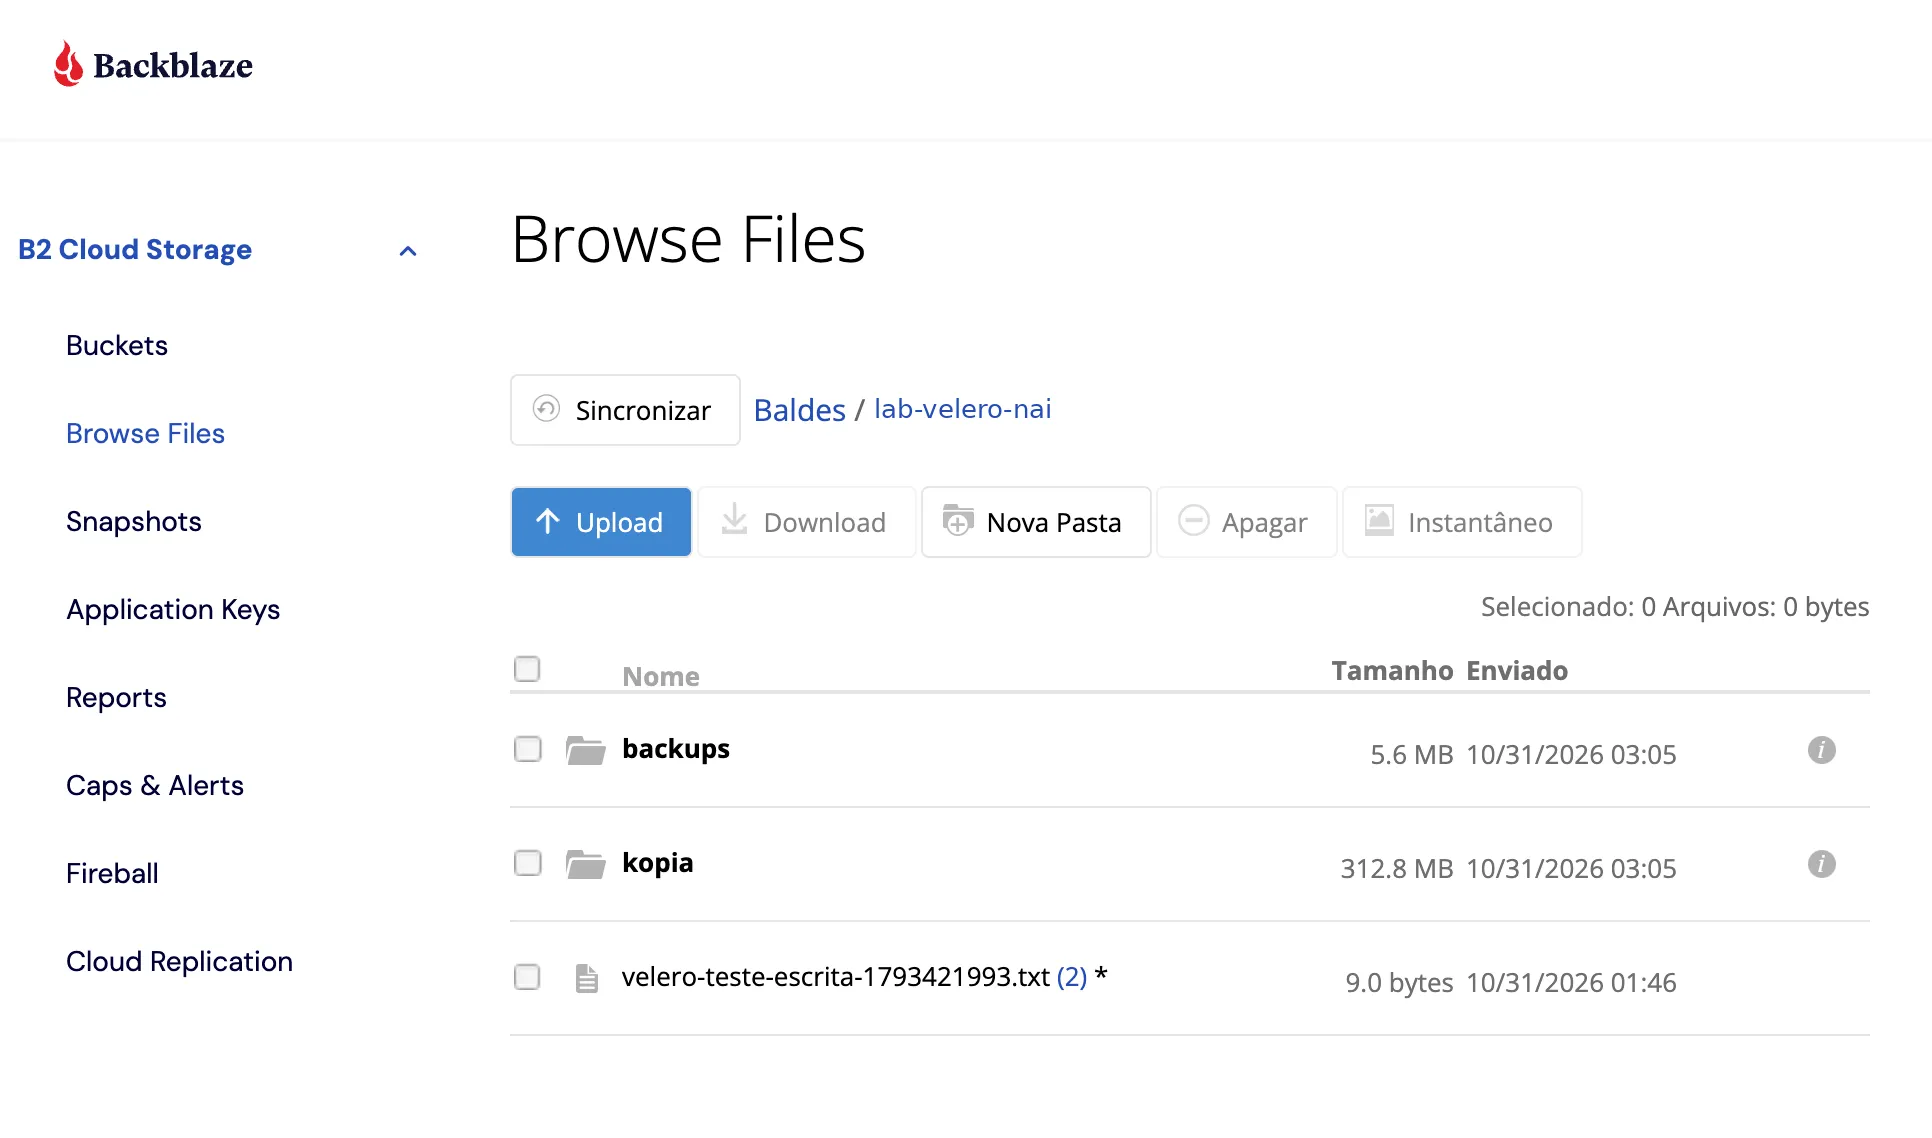
On the first full backup, the limit was the lab’s upload link to B2 (0.2–0.3 MB/s): the 1.5 GB model would take hours. Decision: models out of the backup (they come back from Hugging Face in a minute), with a resourcePolicy that skips the Files storage class:
version: v1volumePolicies: - conditions: storageClass: [nai-nfs] action: type: skipResult: 510 objects and 4 volumes in 776 s, 0 errors. The volumes’ ~710 MB became ~313 MB in the bucket (Kopia compresses and deduplicates):
Restore with the data mover: start a consumer pod
The NKP storage class is WaitForFirstConsumer, and the data mover downloads the data when some pod uses the PVC. In the test restore I restored only the PVCs, with no pods, and it stayed at “Accepted” for 8 minutes. With a check pod mounting the volumes, the restore went ahead: the 632 MB database downloaded in 88 s (B2 download is ~25× faster than the upload), and the content checked with owners and dates preserved.
NDK: a local snapshot in seconds
Nutanix Data Services for Kubernetes 2.3 protects the application with snapshots from the Nutanix storage itself. Installation asks for an NDK-specific Docker Hub credential (the Nutanix portal generates a token), passed in the override:
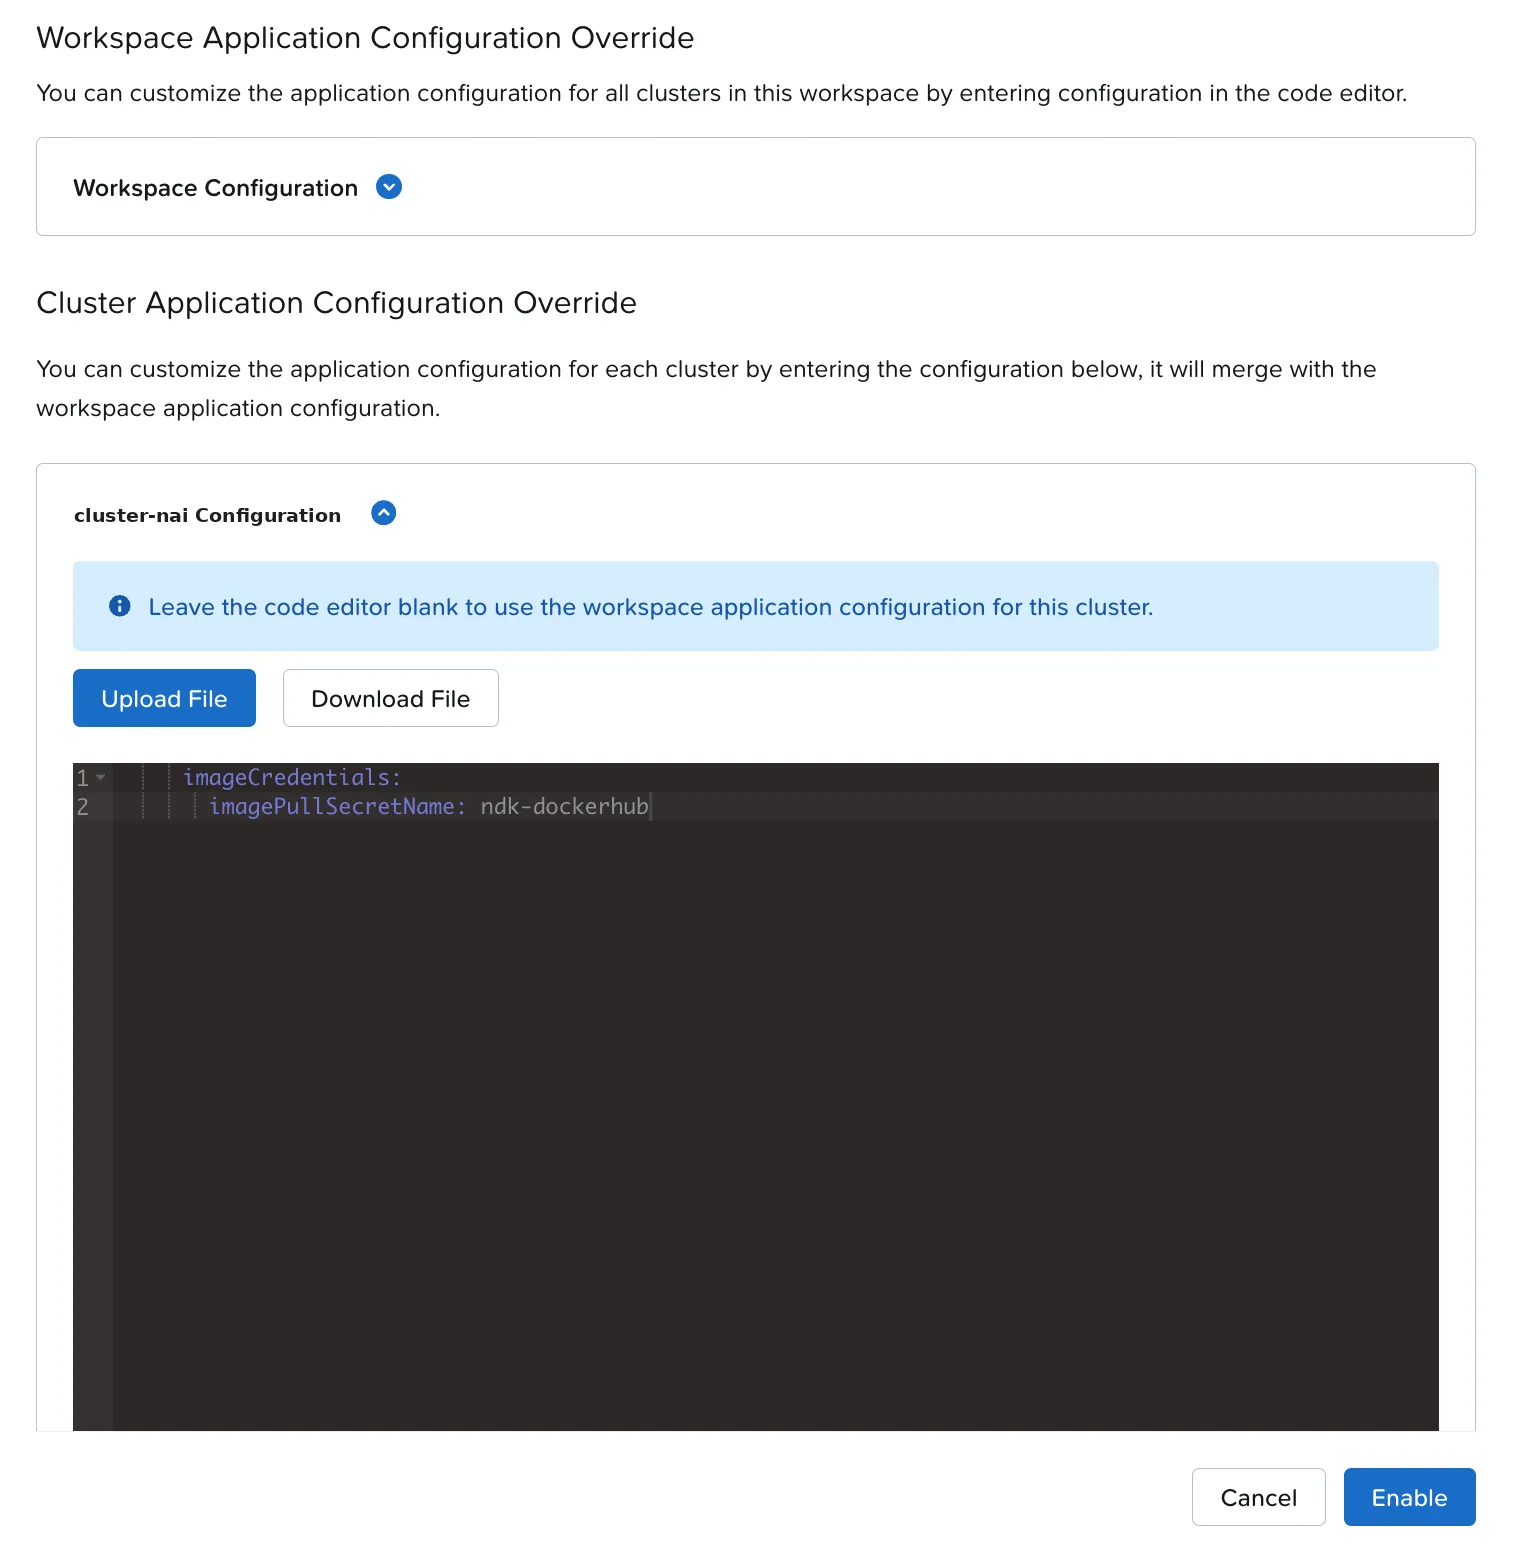
NDK is light: 35m CPU and 256 MiB of requests. After the Enable, three steps:
- StorageCluster: ties NDK to Prism Central and the AOS cluster, by the UUIDs of both. I got them from the Prism v3 API with the credential the CSI already had.
- Application: the whole
nai-systemnamespace. NDK asks for an explicit selector, and the namespace selector is part of a feature that’s off by default (the message is “multi namespace feature not enabled”). The simple way to take the whole namespace is to select everything that doesn’t have a nonexistent label:
apiVersion: dataservices.nutanix.com/v1alpha1kind: Applicationmetadata: name: nai-system namespace: nai-systemspec: applicationSelector: resourceLabelSelectors: - labelSelector: matchExpressions: - { key: lab.example.local/exclude, operator: DoesNotExist }- ApplicationSnapshot: ready in 41 seconds, crash-consistent, with NAI’s deployments, statefulsets, secrets, configmaps and PVCs.
I didn’t restore the whole of NAI into another namespace: it would start a second copy of 18 workloads on a lab cluster with no headroom. I tested the same mechanism with a small application (1 volume with 50 random MB): snapshot in 37 s, restore in 21 s, identical hash. To restore into another namespace, NDK requires a ReferenceGrant in the source namespace.
Velero or NDK? Both
| Velero → B2 | NDK | |
|---|---|---|
| Where the copy lives | Off-site (object, Kopia) | Local Nutanix snapshot |
| NAI backup | 776 s (limited by the link) | 41 s |
| Restore tested | 4 volumes, data checked | Test app, 21 s, identical hash |
| Schedule | Daily, 14-day retention | ProtectionPlan: every 6 h, keep 4 |
| Role | Disaster: I lost the cluster or the site | Operational error: back in seconds, in place |
The numbers
| Measure | Value |
|---|---|
| GB10 GPU, Nemotron 30B (NIM) | 71 tok/s, TTFT 0.08–0.25 s |
| CPU, Qwen3 0.6B (vLLM, 8 vCPU), before / after the tuning | 5.5 → 7.3–8.0 tok/s (+40%) |
| Predictor CPU throttling during generation (before) | 60–77% of periods |
| First request after restart (CPU) | 21.5 s to the first token |
| Gateway resources with Agentic Gateway (default, per replica) | ~5 vCPU and ~10 GiB |
| Rate limit (300 tokens/min per key) | 10 calls accepted, the 11th blocked in 13 ms |
MCP through the gateway (initialize / tools/list / tools/call) | 0.77 s / 0.31 s / 1.44 s |
| Velero: NAI backup without models | 510 objects, 4 volumes, 776 s, ~313 MB in the bucket |
NDK: nai-system snapshot / test restore | 41 s / 21 s |
What I learned
- A gateway in front frees the application from choosing the hardware. CPU for the cheap work, GPU for the heavy work, the same code.
- On CPU, pin the vLLM threads to the pod limit. That was 40% for free. And use
Recreatefor endpoints larger than half a node. - Measure on the server side. The vLLM PodMonitor and the throttling panel showed what no client-side number explained.
- Reserve ~5 vCPU and ~10 GiB per Agentic Gateway replica before any model. And check that the new proxy pod is Running before the first unified endpoint test.
- Token-based rate limiting works as expected, charging the response’s real tokens.
- Validate the remote MCP server before creating the connector: the certificate curve and the MCP session are the two points to check.
- Velero and NDK don’t compete. One takes the copy off-site; the other brings you back in seconds.
- Restoring volumes with the data mover needs a consumer pod when the storage class is
WaitForFirstConsumer.
Checklist: hybrid and protected NAI
- Dedicated NAI API key for the LLM gateway, separate from the test key
- Internal CA in the gateway’s CA bundle (
SSL_CERT_FILE) - Gateway keys enabled per model, per application
-
VLLM_CPU_OMP_THREADS_BINDon the CPU endpoint anddeploymentStrategy: Recreate - Warm-up call after any endpoint restart
- vLLM PodMonitor with
prometheus.kommander.d2iq.io/select: "true"and a Grafana dashboard - ~5 vCPU and ~10 GiB of headroom per gateway replica before creating the first unified endpoint
- API keys associated with each unified endpoint; MCP client keys separate
- Remote MCP server tested (certificate curve, session) before becoming a connector
- Velero with an external target (no Rook Ceph);
resourcePolicyfor the models - Bucket lifecycle set to “last version”
- Helm revision checked after each override Edit
- NDK with StorageCluster, the
nai-systemApplication and a ProtectionPlan - Restore tested on both
What I haven’t tested yet
- The GPU inside NKP itself. In this part, the GPU comes in through the GX10, behind LiteLLM; a GPU endpoint served by NAI on NKP is the lab’s next step.
- External providers in the Agentic Gateway. In the lab, the unified endpoint routed to the local CPU endpoint and MCP to Context7; external providers were outside this test.
- Restoring the whole of NAI into another namespace with NDK. It would start a second copy of 18 workloads on a lab cluster with no headroom; I tested the same mechanism with a small application.
End of the series
From the catalog to MCP: NAI went from the architecture decision (Part 1), got its RWX storage (Part 2), answered its first token (Part 3) and now talks to a GPU, agents, observability and backup. The lab’s next step is the GPU inside NKP itself.
References
Nutanix
- Nutanix Enterprise AI Guide 2.8.1 (Nutanix portal): endpoints, API keys, Agentic Gateway (unified endpoints, MCP servers and connectors, rate limiting)
- Nutanix Data Services for Kubernetes 2.3 (Nutanix portal)
Projects and community
Comments
Comments use GitHub Discussions; you need a GitHub account.